基本
镜像下载
-
推荐raspbian
烧录
选择镜像
使用win32DiskImager烧录
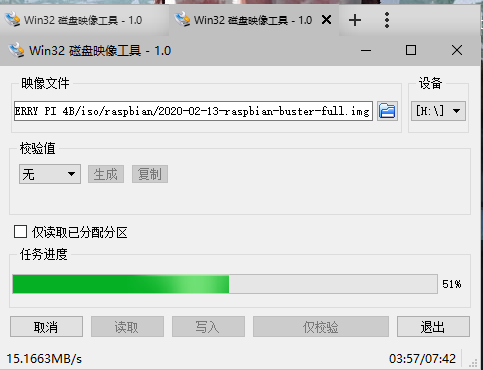
当win10弹出请求格式化窗口时,取消。
烧录成功的分区

使用ssh连接控制 启动并更改root密码
注意 打开daspbian ssh需要 添加 SSH 文件(无后续)

- 查看 ip
登录路由器管理员页面
或使用ip 扫描器 192.168.1.1-192.168.1.254
我这边是192.168.1.115(有线连接)
- 使用ssh.exe连接
ssh pi@192.168.1.115需注意raspbian一开始只能使用 pi 用户 且密码为raspberry
- raspbian
sudo passwd root #设置密码
sudo passwd --unlock root #开启root账户- kali
默认root密码为toor
更新源
- kali
sudo nano /etc/apt/sources.list
#中科大
deb http://mirrors.ustc.edu.cn/kali kali-rolling main non-free contrib
deb-src http://mirrors.ustc.edu.cn/kali kali-rolling main non-free contrib
#aliyun
deb http://mirrors.aliyun.com/kali kali-rolling main non-free contrib
deb-src http://mirrors.aliyun.com/kali kali-rolling main non-free contrib
#清华
deb http://mirrors.tuna.tsinghua.edu.cn/kali kali-rolling main contrib non-free
deb-src https://mirrors.tuna.tsinghua.edu.cn/kali kali-rolling main contrib non-free修改apt软件源 和 系统源
添加进去 ,最好先备份
sudo nano /etc/apt/sources.list
deb http://mirrors.tuna.tsinghua.edu.cn/raspbian/raspbian/ buster main contrib non-free rpi
deb-src http://mirrors.tuna.tsinghua.edu.cn/raspbian/raspbian/ buster main contrib non-free rpi
完成源的更新软件包索引
sudo apt-get update接着更新系统源
sudo nano /etc/apt/sources.list.d/raspi.list

deb http://mirrors.tuna.tsinghua.edu.cn/raspberrypi/ buster main ui
deb-src http://mirrors.tuna.tsinghua.edu.cn/raspberrypi/ buster main ui最后sudo apt-get upgrade
配置pip源
~/.pip/pip.conf

[global]
index-url = http://pypi.douban.com/simple/
打开 设置wifi
sudo raspi-config
SSID:WIFI_NAME
password:WIFI_Password
在win10通过查看wifi的属性来获取SSID

扩展分区
sudo raspi-config #选择7 -> A1df -h查看
win远程?
1.安装相关服务
卸载原tightvnc
sudo apt-get purge tightvnc xrdp
安装tighyvnc xrdp
sudo apt-get install tightvncserver xrdp
2.开启连接
win+r > mstsc
输入用户名和密码就行
查看树莓派 信息
- CPU温度、CPU占用情况、内存占用情况和硬盘占用
来源
get-raspberry-the-current-status-and-data.html
import os
# Return CPU temperature as a character string
def getCPUtemperature():
    res = os.popen('vcgencmd measure_temp').readline()
    return(res.replace("temp=","").replace("'C\n",""))

# Return RAM information (unit=kb) in a list
# Index 0: total RAM
# Index 1: used RAM
# Index 2: free RAM
def getRAMinfo():
    p = os.popen('free')
    i = 0
    while 1:
        i = i + 1
        line = p.readline()
        if i==2:
            return(line.split()[1:4])

# Return % of CPU used by user as a character string
def getCPUuse():
    return(str(os.popen("top -n1 | awk '/Cpu\(s\):/ {print $2}'").readline().strip()))

# Return information about disk space as a list (unit included)                   # Index 0: total disk space                                                       # Index 1: used disk space                                                       # Index 2: remaining disk space                                                   # Index 3: percentage of disk used                                               def getDiskSpace():
    p = os.popen("df -h /")
    i = 0
    while 1:
        i = i +1
        line = p.readline()
        if i==2:
            return(line.split()[1:5])
# CPU informatiom
CPU_temp = getCPUtemperature()
CPU_usage = getCPUuse()

# RAM information
# Output is in kb, here I convert it in Mb for readability
RAM_stats = getRAMinfo()
RAM_total = round(int(RAM_stats[0]) / 1000,1)
RAM_used = round(int(RAM_stats[1]) / 1000,1)
RAM_free = round(int(RAM_stats[2]) / 1000,1)

# Disk information
DISK_stats = getDiskSpace()
DISK_total = DISK_stats[0]
DISK_used = DISK_stats[1]
DISK_perc = DISK_stats[3]

if __name__ == '__main__':
    print('')
    print('CPU Temperature = '+CPU_temp)
    print('CPU Use = '+CPU_usage)
    print('')
    print('RAM Total = '+str(RAM_total)+' MB')
    print('RAM Used = '+str(RAM_used)+' MB')
    print('RAM Free = '+str(RAM_free)+' MB')
    print('')
    print('DISK Total Space = '+str(DISK_total)+'B')
    print('DISK Used Space = '+str(DISK_used)+'B')
    print('DISK Used Percentage = '+str(DISK_perc))
添加执行权限并执行
chmod +x get.py
python3 get.py
网站搭建
安装Nginx + php 7.3 + MariaDB
Nginx
sudo apt-get install -y nginxphp
sudo apt install -y -t buster php7.3-fpm php7.3-curl php7.3-gd php7.3-intl php7.3-mbstring php7.3-mysql php7.3-imap php7.3-opcache php7.3-sqlite3 php7.3-xml php7.3-xmlrpc php7.3-zipMariaDB
sudo apt-get install mariadb-server - 设置初始密码及修改密码
https://www.cnblogs.com/messhair/p/11782850.html
MariaDB [(none)]> use mysql;
MariaDB [mysql]> UPDATE mysql.user SET password = PASSWORD('xzlxr@mysql') WHERE user = 'root';
MariaDB [mysql]> UPDATE user SET plugin='mysql_native_password' WHERE user = 'root';
MariaDB [mysql]> FLUSH PRIVILEGES;  #刷新权限相关表格
restart
sudo service mariadb restart登录
mysql -u root -p输入新密码即可
apache2
sudo apt install apache2
sudo apt-get install libapache2-mod-php
配置(暂时无安全加固)
Nginx 配置
打开配置文件
sudo nano /etc/nginx/sites-available/default连接php以及添加 index.php
sudo service nginx restart
sudo service php7.3-fpm restart
安装typecho
sudo wget http://typecho.org/downloads/1.1-17.10.30-release.tar.gz
sudo tar zxvf 1.1-17.10.30-release.tar.gz
wordpass
使用 Frp 实现内网穿透,公网访问web服务器,设置自动启动,后台运行
参考:
使用 Frp 实现内网穿透,公网访问web服务器,设置自动启动,后台运行
通过frp穿透内网ssh访问树莓派
https://github.com/fatedier/frp/releases
- 客户端配置
在树莓派上
wget https://github.com/fatedier/frp/releases/download/v0.32.0/frp_0.32_linux_arm.tar.gz
tar -zxvf frp_0.32_linux_arm.tar.gz
cd frp_0.32_linux_arm
sudo nano frpc.ini

[common]
token = xxxx #your_service_token
server_addr = xxx.xxx.xxx.xxx#服务器ip
server_port = XXXX#服务器端口

[web]
type = http
local_ip = xxx.xxx.xxx.xxx #本地ip
local_port = 80
remote_port = 80
custom_domains = #你的域名
在树莓派上添加自启
sudo nano /lib/systemd/system/frpc.service

[Unit]
Description=frpc service
After=network.target syslog.target
Wants=network.target

[Service]
Type=simple
ExecStart=/home/pi/frp/frpc -c /home/pi/frp/frpc.ini

[Install]
WantedBy=multi-user.target
重启Frpc,可以 sudo systemctl restart frpc
停止Frpc,可以 sudo systemctl stop frpc
v2ray
SSR
添加sitemap.xml
一开始想直接用插件的(插件,他不香吗)
但问题是,我的vps是代理转发的,而实际的博客vps地址。。。只有内网地址(192.168.1.xxx),试了google-sitemap(不行),改了wp上的url设置还是不行。。。
最后的方案:
- 编写sitemap.php
<?php

require('./wp-blog-header.php');

header("Content-type: text/xml");

header('HTTP/1.1 200 OK');

$posts_to_show = 1000;

echo '<?xml version="1.0" encoding="UTF-8"?>';

echo '<urlset xmlns="http://www.sitemaps.org/schemas/sitemap/0.9" xmlns:mobile="http://www.baidu.com/schemas/sitemap-mobile/1/">'

?>

<!-- generated-on=<?php echo get_lastpostdate('blog'); ?> -->

<url>

<loc><?php echo get_home_url(); ?></loc>

<lastmod><?php $ltime = get_lastpostmodified(GMT);$ltime = gmdate('Y-m-d\TH:i:s+00:00', strtotime($ltime)); echo $ltime; ?></lastmod>

<changefreq>daily</changefreq>

<priority>1.0</priority>

</url>

<?php

/* 文章页面 */

$myposts = get_posts( "numberposts=" . $posts_to_show );

foreach( $myposts as $post ) { ?>

<url>

<loc><?php the_permalink(); ?></loc>

<lastmod><?php the_time('c') ?></lastmod>

<changefreq>monthly</changefreq>

<priority>0.6</priority>

</url>

<?php } /* 文章循环结束 */ ?>

<?php

/* 单页面 */

$mypages = get_pages();

if(count($mypages) > 0) {

foreach($mypages as $page) { ?>

<url>

<loc><?php echo get_page_link($page->ID); ?></loc>

<lastmod><?php echo str_replace(" ","T",get_page($page->ID)->post_modified); ?>+00:00</lastmod>

<changefreq>weekly</changefreq>

<priority>0.6</priority>

</url>

<?php }} /* 单页面循环结束 */ ?>

<?php

/* 博客分类 */

$terms = get_terms('category', 'orderby=name&hide_empty=0' );

$count = count($terms);

if($count > 0){

foreach ($terms as $term) { ?>

<url>

<loc><?php echo get_term_link($term, $term->slug); ?></loc>

<changefreq>weekly</changefreq>

<priority>0.8</priority>

</url>

<?php }} /* 分类循环结束 */?>

<?php

/* 标签(可选) */

$tags = get_terms("post_tag");

foreach ( $tags as $key => $tag ) {

$link = get_term_link( intval($tag->term_id), "post_tag" );

if ( is_wp_error( $link ) )

return false;

$tags[ $key ]->link = $link;

?>

<url>

<loc><?php echo $link ?></loc>

<changefreq>monthly</changefreq>

<priority>0.4</priority>

</url>

<?php  } /* 标签循环结束 */ ?>

</urlset>
-
Yoast SEO #目前来看最好用的SEO插件


可以 可以 周围有 视频网站关灯的效果 嘿嘿嘿
很棒,这样的话相当于把服务器放在自己家里了。
不过访问速度怎么保证呢?用了CDN吗?
老实说,我现在还没有使用CDN,访问速度应该是由你购买的VPS的网络速度和树莓派的网络环境共同决定。
为了维持正常的访问速度的问题,某种程度上,也就如何减少图片加载图片的时间。解决方案的话,我利用图床上的图片,而不是WORDPRESS上的图片,同时尽可能不用图片。
现在访问速度挺快的~
图床的话,我用aliyun oss,装上插件后在wordpress上传图片会自动上传到aliyun,这样网站目录不会太重,访问图片也挺快。你用什么图床,有些图床突然不提供服务的话照片没有了比较麻烦
我用的是七牛云oss(挺稳的),配个typoar(markdown)和picGO(自动上传图片到图床),贼方便。?前辈,你上次访问的时候慢,是因为我用手机热点为Pi提供网络,现在的话是校园网(工作日晚上会断网)。