搭建web运行的基础环境
基本信息
- 任务目标:准备学习环境,学习web服务器的搭建过程,并做相应的加固学习
- 操作系统:win10家庭版+ vm15
- 预装环境:ubuntu 18.04 + nginx + php-fpm + mysql
- 报告要求:搭建过程详细记录,收集加固文档,学习加固技术
搭建 0x01
安装 nginx + php-fpm + mysql
Nginx的安装
这篇文章涵盖nginx + php-fpm + mysql的详细安装过程和指南
更新系统软件源
- 备份原有软件源文件
cp /etc/apt/sources.list /etc/apt/sources.list.bak - 打开并更改
sudo gedit /etc/apt/sources.list - 添加源
#添加阿里源
deb http://mirrors.aliyun.com/ubuntu/ bionic main restricted universe multiverse
deb http://mirrors.aliyun.com/ubuntu/ bionic-security main restricted universe multiverse
deb http://mirrors.aliyun.com/ubuntu/ bionic-updates main restricted universe multiverse
deb http://mirrors.aliyun.com/ubuntu/ bionic-proposed main restricted universe multiverse
deb http://mirrors.aliyun.com/ubuntu/ bionic-backports main restricted universe multiverse
deb-src http://mirrors.aliyun.com/ubuntu/ bionic main restricted universe multiverse
deb-src http://mirrors.aliyun.com/ubuntu/ bionic-security main restricted universe multiverse
deb-src http://mirrors.aliyun.com/ubuntu/ bionic-updates main restricted universe multiverse
deb-src http://mirrors.aliyun.com/ubuntu/ bionic-proposed main restricted universe multiverse
deb-src http://mirrors.aliyun.com/ubuntu/ bionic-backports main restricted universe multiverse-
更新
sudo apt-get update
sudo apt-get upgrade -
当
sudo apt-get update出现
W: Some index files failed to download. They have been ignored, or old ones used instead.时
解决方案
sudo vim /etc/resolv.conf
添加
#这里用的使用的是阿里云的DNS服务器,根据你使用的源来填写
nameserver 223.5.5.5
nameserver 223.6.6.6
再次更新
参考:
https://blog.csdn.net/feiniao8651/article/details/60332535
- 其他
其他源
但从个人经历而言
最好的方法是使用Software & Update的Select Best Server来选择源
点击Download from
后选择Select Best Server
安装 nginx
sudo apt-get install nginx
文件结构大致如下:
- 所有配置文件在
/etc/nginx,且每个虚拟主机已经安排在/etc/nginx/sites-acailable/ - 程序文件在
/usr/sbin/nginx但目前没有? - 日志文件在
/var/log/nginx - 默认的虚拟主机的目录设置在
/var/www/html注意,请看配置文件/etc/nginx/sites-acailable/ - 启动脚本
sudo /etc/init.d/nginx start,访问 http://127.0.0.1
安装php ,mysql
考虑版本更新问题,装php7.4版本
php支援版本信息
- Add PHP PPA Repository
sudo apt-get update
sudo apt -y install software-properties-common
sudo add-apt-repository ppa:ondrej/php
sudo apt-get update
可能遇到问题
add-apt-repository ppa:ondrej/php会有错误或长时间无回应
字符编码的锅
解决方案
sudo LC_ALL=C.UTF-8 add-apt-repository ppa:ondrej/php- 但有Error显示
Error: retrieving gpg key timed out.
需要手动添加ppa源
PPA源
注意要选择版本
deb http://ppa.launchpad.net/ondrej/php/ubuntu bionic main
deb-src http://ppa.launchpad.net/ondrej/php/ubuntu bionic main
打开源并添加
sudo gedit /etc/apt/sources.list
deb http://ppa.launchpad.net/ondrej/php/ubuntu bionic main
deb-src http://ppa.launchpad.net/ondrej/php/ubuntu bionic main
在Terminal添加Signing Key
sudo apt-key adv --keyserver keyserver.ubuntu.com --recv-keys 14AA40EC0831756756D7F66C4F4EA0AAE5267A6C
再更新
sudo apt-get update && sudo apt-get upgrade
推荐另一种方法 install PHP 7.4 & mysql
首先添加sury.org提供的存储库
sudo apt-get install apt-transport-https -y
sudo wget -O /etc/apt/trusted.gpg.d/php.gpg https://packages.sury.org/php/apt.gpg
echo "deb https://packages.sury.org/php/ stretch main" | sudo tee /etc/apt/sources.list.d/php.list
更新软件包列表
sudo apt-get update安装用于nginx和PHP -fpm功能的PHP 7.4包
sudo apt-get install php7.4-cli php7.4-curl php7.4-mysql php7.4-fpm php7.4-gd php7.4-xml php7.4-mbstring php7.4-zip php7.4-soap php7.4-dev -y如果这步报错试试
sudo apt-get install libcurl3将CLI更新到PHP 7.4
sudo update-alternatives --set php /usr/bin/php7.4mysql install
sudo apt install mysql-server进行安装与配置
sudo mysql_secure_installation安装之后便可使用
sudo mysql配置 Nginx

修改主机名于配置文件
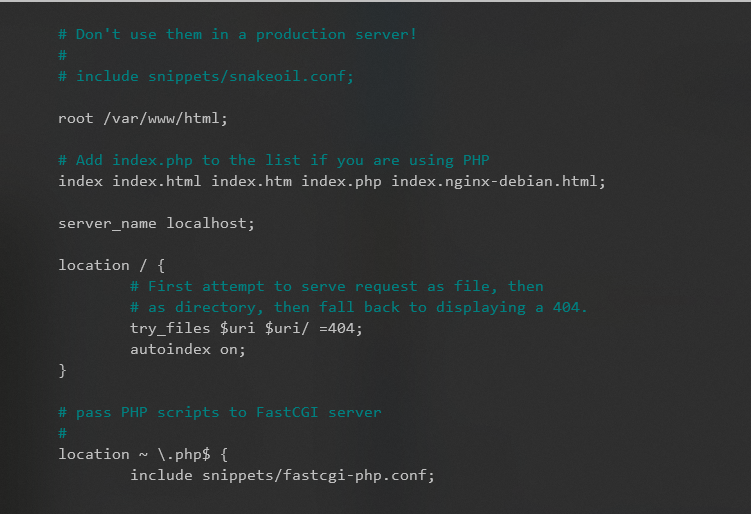
sudo gedit /etc/nginx/sites-available/default 添加index.php
更改一下注释为
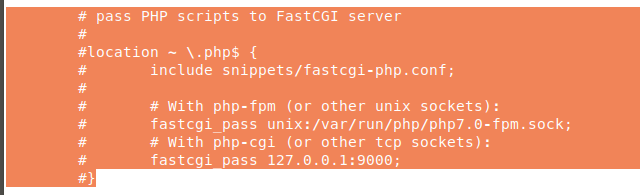
    location ~ \.php$ {
        include snippets/fastcgi-php.conf;

        # With php-fpm (or other unix sockets):
        fastcgi_pass unix:/var/run/php/php7.4-fpm.sock;
        # With php-cgi (or other tcp sockets):
        #fastcgi_pass 127.0.0.1:9000;
    }
重启nginx和php
sudo service nginx restart
sudo service php7.4-fpm restart
测试
vim /var/www/html/info.php
<?php phpinfo();?>访问localhost/info
/var/www/html目录下,创建数据库连接文件conmysql.php
<?php
    echo "demo";
    echo "connecting mysql <br/>";
    $link=mysqli_connect("127.0.0.1","root","password");  //mysqli_connect()
    if(!link)
    {
        echo "Sorry the connection of mysql failed!";
        echo "error message: ".mysql_error()."<br/>";
    }
    else
        echo "connect success!"."<br/>";
?>
url localhost/conmysql.php
参考文章:
php7.4 install
Install PHP 7.4 FPM on Ubuntu 18.04
Ubuntu Nginx
how-to-install-linux-nginx-mysql-php-lemp-stack-ubuntu-18-04
Ubuntu 16.04中配置nginx + php + mysql
模拟环境搭建
在安全加固之前,可以先搭建模拟环境,同时也便于今后学习。这一点从Keefe_blog学来。
- 创建数据库
mysql - u root -p123
CREATE TABLE MyGuests (
id INT(6) UNSIGNED AUTO_INCREMENT PRIMARY KEY,
firstname VARCHAR(30) NOT NULL,
lastname VARCHAR(30) NOT NULL,
email VARCHAR(50),
reg_date TIMESTAMP
);
INSERT INTO MyGuests (firstname, lastname, email) VALUES ('John', 'Doe', 'john@example.com');
INSERT INTO MyGuests (firstname, lastname, email) VALUES ('Mary', 'Moe', 'mary@example.com');
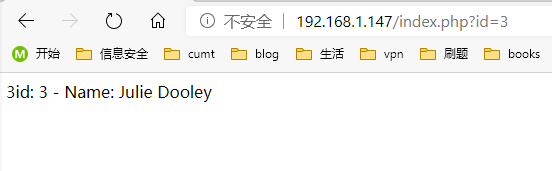
INSERT INTO MyGuests (firstname, lastname, email) VALUES ('Julie', 'Dooley', 'julie@example.com');conmysql.php
<?php
$servername  = "127.0.0.1";
$username = "root";
$password = "password";
$dbname = "demo";

$conn = mysqli_connect($servername, $username, $password, $dbname);
// Check connection
if (!$conn) {
    die("mysqli_connect_error: " . mysqli_connect_error());
}
?>
index.php
<!DOCTYPE html>
<html lang="en" dir="ltr">
  <head>
    <meta charset="utf-8">
    <title>用户信息</title>
  </head>
  <body>
<?php
@include('conmysql.php')

$id = $_GET['id'];
echo $id;
if (isset($id))
{
    $sql = "SELECT id, firstname, lastname FROM MyGuests where id = $id";
    $result = mysqli_query($conn, $sql);

    if (mysqli_num_rows($result) > 0)
        {
        // 输出数据
        while($row = mysqli_fetch_assoc($result))
            {
            echo "id: " . $row["id"]. " - Name: " . $row["firstname"]. " " . $row["lastname"]. "<br>";
         }
    }
    else
    {
        echo "no result";
    }
}
else
{
    echo "please sent your id ";
}
mysqli_close($conn);
?>
参考:
搭建 LNMP 环境及一些安全加固总结
runoob_php
安全加固
此部分的学习基本上源于网上的相关文档。分别从php、msyql、nginx、ubuntu四个部分进行安全加固。
参考文章:
web安全加固
https://github.com/php/php-src
PHP环境安全加固
centos lnmp及安全加固
[nginx安全配置 ][nginx安全配置 ]
Nginx 加固
配置文件
- 安装位置: /etc/nginx
- 全局站点的配置文件: /etc/nginx/nginx.conf
- 网站默认站点配置文件: /etc/nginx/sites-available/default
- 需注意修改文件后,要重新加载
sudo service nginx reload隐藏nginx版本号
nginx版本信息的泄露,将便于黑客查找相应版本的漏洞并利用。
修改 /etc/nginx/nginx.conf将server_token off前的注释删去即可。
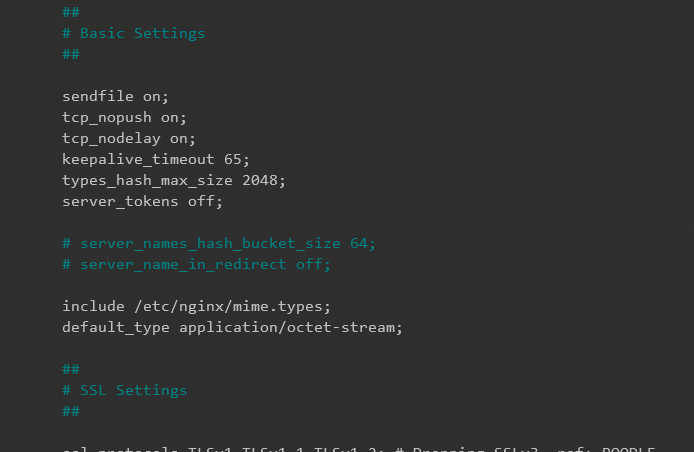
此时报错后无版本信息

禁止目录浏览
打开目录浏览,会将文件和文件夹信息暴力出来,一般默认关闭
/etc/nginx/sites-available/default
相应效果
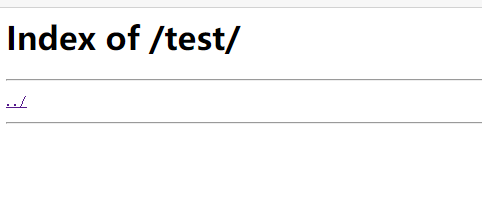
autoindex off;当关闭时,会显示403

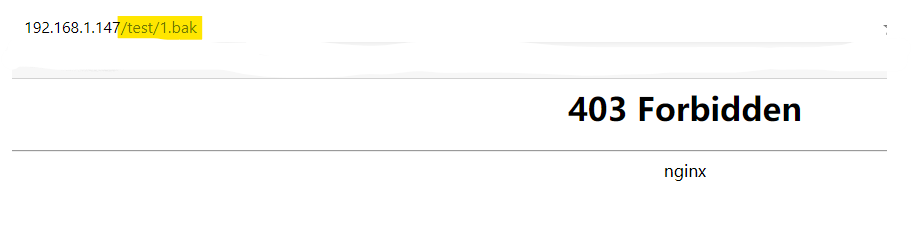
限制访问敏感文件
这类问题主要是源代码或敏感信息泄露。
常见的有.DS_Store,.git,.ht,各类压缩文件(.rar .zip .7z .tar.gz ),备份文件(.bak) ,.txt
之外 还有 SVN导致文件泄露, WEB-INF/web.xml泄露 CVS泄漏
修改文件为/etc/nginx/sites-available/default
        # Restrict access to sensitive files in test folder
        location ~* \.(ht|git|bak|7z|zip|rar|txt)$ {
                deny all;
        }
这将禁止可以防止.ht .git .bak .7z .zip .rar .txt文件泄露,但最好的方法还是删除 不必要的文件
推荐:
限制HTTP请求方式
只允许GET|POST|HEAD 这三种方式请求,如果是之外的请求,则返回444状态码
444 是 Nginx 定义的响应状态码,会立即断开连接,没有响应正文
if ($request_method !~ ^(GET|HEAD|POST)$ ) {
    return    444;
}
Nginx降权启动
在 /etc/nginx/nginx.conf 修改
user nobody;当然也可以使用普通用户,来防止ROOT分配权限过大。
nobody在linux中是一个不能登陆的帐号,一些服务进程如apache,aquid等都采用一些特殊的帐号来运行,比如nobody,news,games等等,这是就可以防止程序本身有安全问题的时候,不会被黑客获得root权限
禁止文件上传目录执行php
其配置方式与限制访问敏感文件一致
注意空格
location ~* ^/(attachments|data)/.*\.(php|php5)$ {
    deny all;
}
针对SQL注入的配置
参考于:
https://blog.csdn.net/lyj1101066558/article/details/54346053
https://www.imydl.tech/lnmp/762.html
 if ($request_method !~* GET|POST) { return 444; }
 #使用444错误代码可以更加减轻服务器负载压力。
 #防止SQL注入
 if ($query_string ~* (\$|'|--|[+|(%20)]union[+|(%20)]|[+|(%20)]insert[+|(%20)]|[+|(%20)]drop[+|(%20)]|[+|(%20)]truncate[+|(%20)]|[+|(%20)]update[+|(%20)]|[+|(%20)]from[+|(%20)]|[+|(%20)]grant[+|(%20)]|[+|(%20)]exec[+|(%20)]|[+|(%20)]where[+|(%20)]|[+|(%20)]select[+|(%20)]|[+|(%20)]and[+|(%20)]|[+|(%20)]or[+|(%20)]|[+|(%20)]count[+|(%20)]|[+|(%20)]exec[+|(%20)]|[+|(%20)]chr[+|(%20)]|[+|(%20)]mid[+|(%20)]|[+|(%20)]like[+|(%20)]|[+|(%20)]iframe[+|(%20)]|[\<|%3c]script[\>|%3e]|javascript|alert|webscan|dbappsecurity|style|confirm\(|innerhtml|innertext)(.*)$) { return 555; }
 if ($uri ~* (/~).*) { return 501; }
 if ($uri ~* (\\x.)) { return 501; }
 #防止SQL注入
 if ($query_string ~* "[;'<>].*") { return 509; }
 if ($request_uri ~ " ") { return 509; }
 if ($request_uri ~ (\/\.+)) { return 509; }
 if ($request_uri ~ (\.+\/)) { return 509; }

 #if ($uri ~* (insert|select|delete|update|count|master|truncate|declare|exec|\*|\')(.*)$ ) { return 503; }
 #防止SQL注入
 if ($request_uri ~* "(cost\()|(concat\()") { return 504; }
 if ($request_uri ~* "[+|(%20)]union[+|(%20)]") { return 504; }
 if ($request_uri ~* "[+|(%20)]and[+|(%20)]") { return 504; }
 if ($request_uri ~* "[+|(%20)]select[+|(%20)]") { return 504; }
 if ($request_uri ~* "[+|(%20)]or[+|(%20)]") { return 504; }
 if ($request_uri ~* "[+|(%20)]delete[+|(%20)]") { return 504; }
 if ($request_uri ~* "[+|(%20)]update[+|(%20)]") { return 504; }
 if ($request_uri ~* "[+|(%20)]insert[+|(%20)]") { return 504; }
 if ($query_string ~ "(<|%3C).*script.*(>|%3E)") { return 505; }
 if ($query_string ~ "GLOBALS(=|\[|\%[0-9A-Z]{0,2})") { return 505; }
 if ($query_string ~ "_REQUEST(=|\[|\%[0-9A-Z]{0,2})") { return 505; }
 if ($query_string ~ "proc/self/environ") { return 505; }
 if ($query_string ~ "mosConfig_[a-zA-Z_]{1,21}(=|\%3D)") { return 505; }
 if ($query_string ~ "base64_(en|de)code\(.*\)") { return 505; }
 if ($query_string ~ "[a-zA-Z0-9_]=http://") { return 506; }
 if ($query_string ~ "[a-zA-Z0-9_]=(\.\.//?)+") { return 506; }
 if ($query_string ~ "[a-zA-Z0-9_]=/([a-z0-9_.]//?)+") { return 506; }
 if ($query_string ~ "b(ultram|unicauca|valium|viagra|vicodin|xanax|ypxaieo)b") { return 507; }
 if ($query_string ~ "b(erections|hoodia|huronriveracres|impotence|levitra|libido)b") {return 507; }
 if ($query_string ~ "b(ambien|bluespill|cialis|cocaine|ejaculation|erectile)b") { return 507; }
 if ($query_string ~ "b(lipitor|phentermin|pro[sz]ac|sandyauer|tramadol|troyhamby)b") { return 507; }
PHP 加固
配置文件
php 的 配置文件为 php.ini,其具体位置可通过phpinfo()查询(/etc/php/7.4/fpm/php.ini)。
关于PHP的安全模式
safe_mode = on 但safe_mode早在php5.3起废除,并将自 PHP 5.4.0 起移除。当然也不排除有些网站还会使用php5.3之前的版本.
具体信息features.safe-mode.php
禁用不安全的PHP 函数
我这边php.ini中之前有默认设置
disable_functions = pcntl_alarm,pcntl_fork,pcntl_waitpid,pcntl_wait,pcntl_wifexited,pcntl_wifstopped,pcntl_wifsignaled,pcntl_wifcontinued,pcntl_wexitstatus,pcntl_wtermsig,pcntl_wstopsig,pcntl_signal,pcntl_signal_get_handler,pcntl_signal_dispatch,pcntl_get_last_error,pcntl_strerror,pcntl_sigprocmask,pcntl_sigwaitinfo,pcntl_sigtimedwait,pcntl_exec,pcntl_getpriority,pcntl_setpriority,pcntl_async_signals,pcntl_unshare,
然后添加了
passthru,exec,system,chroot,chgrp,chown,shell_exec,proc_open,proc_get_status,ini_alter,ini_restore,dl,openlog,syslog,readlink,symlink,popepassthru,stream_socket_server,fsocket,phpinfo关闭错误显示
display_errors = Off
避免因为错误而泄露相关信息
设置错误日志
log_errors = On
错误和日志记录配置选项
Session 安全配置可以查看
session.security.ini.php
session.cookie_httponly=On
禁止 JavaScript 访问会话 cookie。 此设置项可以保护 cookie 不被 JavaScript 窃取。推荐会话ID cookie 设置 httponly 为 On。
关闭PHP信息
限制跨目录访问
open_basedir = /www/
默认是所有文件
将PHP可以访问的文件限制在指定的目录树中,包括文件本身。这个指令不受安全模式是开启还是关闭的影响。官方手册描述
Note:
As of PHP 5.3.0 open_basedir can be tightened at run-time. This means that if open_basedir is set to /www/ in php.ini a script can tighten the configuration to /www/tmp/ at run-time with ini_set(). When listing several directories, you can use the PATH_SEPARATOR constant as a separator regardless of the operating system.
上传目录限制
upload_tmp_dir = /tmp
执行文件上载时用于存储文件的临时目录。必须是可写的任何用户PHP正在运行。如果没有指定,PHP将使用系统的默认值 . 其他有关upload 的还有 file_uploads upload_max_filesize max_file_uploads
SQL注入防护
magci_quotes_gps
为 GPC (Get/Post/Cookie) 操作设置 magic_quotes 状态。 当 magic_quotes 为 on,所有的 ‘ (单引号)、" (双引号)、\(反斜杠)和 NUL’s 被一个反斜杠自动转义。适用版本:在 PHP <= 4.2.3 是 PHP_INI_ALL,在 PHP 5.4.0 中被移除
Note:
如果 magic_quotes_sybase 也是 ON,它会完全覆盖 magic_quotes_gpc。 两个指令都启用意味着只有单引号被转义为 ”。 双引号、反斜杠和 NUL’s 不会被转义。
mysql加固
参考:
账户安全
- 禁止使用管理员权限运行
以普通账户安全运行mysqld,禁止以管理员账号权限来运行MYSQL 服务,
配置文件/etc/mysql/my.cnf 为全局选项, ~/.my.cnf 为用户特定选项
-
-
修改为
-
[mysql.server]
user=mysql
-
-
避免不同用户间共享账号
-
- 创建用户 xzlxr 密码 xzlxr2333
GRANT USAGE ON *.* TO 'xzlxr'@'%' IDENTIFIED BY 'any@hin$' WITH GRANT OPTION;刷新生效
FLUSH PRIVILEGES;查看账户
select host,user,authentication_string from mysql.user;- 切换账号
mysql -u xzlxr -p- 删除账号
使用DROP USER 可以删除一个或多个MYSQL账户。使用 DROP USER 语句必须拥有 MySQL 中的 MySQL 数据库的 DELETE 权限或全局 CREATE USER 权限。在 DROP USER 语句的使用中,若没有明确地给出账户的主机名,则该主机名默认为“%”
没有权限时的ERROR
ERROR 1227 (42000): Access denied; you need (at least one of) the CREATE USER privilege(s) for this operation
口令
检查账户默认密码和弱密码。口令长度需要至少八位,并包括数字、小写字母、大写字母和特殊符号四类中的至少两种类型,且五次以内不得设置相同的口令。密码应至少每 90 天进行一次更换。
update user set  authentication_string=password('any@hin$') where user="xzlxr";
flush privileges;
授权
在数据库权限配置能力范围内,根据用户的业务需要,配置其所需的最小权限。
-
查看数据库授权情况
use mysql; select * from user; select * from db; select * from host; select * from tables_priv; select * from columns_priv;- 更新权限,为xzlxr用户添加SELECT 权限
SELECT Host,User,Select_priv,Grant_priv from user where user = 'xzlxr'; #查看权限 update user set Select_priv = "Y" where user='xzlxr'; flush privileges- 通过 revoke 命令回收不必要的或危险的授权。
可以使用
help revoke来查看使用
开启日志审核功能
数据库应配置日志功能,便于记录运行状况和操作行为。
MySQL服务有以下几种日志类型:
| 错误日志 | -log-err |
|---|---|
| 查询日志 | -log (可选) |
| 慢查询日志 | -log-slow-queries (可选) |
| 更新日志 | -log-update |
| 二进制日志 | -log-bin |
#Enter a name for the binary log.
#log-bin= mysql_bin
#Enter a name for the query log file.
#log=
#Enter a name for the error log file.
log-error=/var/log/mysql/error.log
#Enter a name for the update log file. Otherwise a default name will be
#log-update=
日志查询操作说明
执行show variables like 'log_%';命令可查看所有的 log。
此处已经添加error.log
my.cnf的其他配置
其他配置推荐看这篇
搭建 0x02
Apache
安装 Apache
apache2的安装我还是安装在原ubuntu上的
sudo apt install apache2配置文件
- apache2的配置文件在
/etc/apache2/apache2.conf同时在apache2.conf 描述了配置文件,apache2.conf 为一个主配置文件,通过including 方式包含其他配置文件.如果需要更多详细信息可以看官网
此外,在/usr/share/doc/apache2/README.Debian.gz中描述了apache2在Debain中的特殊点
两个文件都写的很仔细,好评
- apache2的目录
#   /etc/apache2/
#   |-- apache2.conf
#   |   `--  ports.conf
#   |-- mods-enabled
#   |   |-- *.load
#   |   `-- *.conf
#   |-- conf-enabled
#   |   `-- *.conf
#   `-- sites-enabled
# `-- *.conf- 端口配置文件为
/etc/apache2/ports.conf
# If you just change the port or add more ports here, you will likely also
# have to change the VirtualHost statement in
# /etc/apache2/sites-enabled/000-default.conf

Listen 80

<IfModule ssl_module>
        Listen 443
</IfModule>

<IfModule mod_gnutls.c>
        Listen 443
</IfModule>

# vim: syntax=apache ts=4 sw=4 sts=4 sr noetmods-availablel和mods-enabled文件夹:这两个文件夹里面存放的都是一些apache2的读写操作等模块,mods-enabled是apache2服务器启动配置的文件,mods-available是apache2服务器可以用的配置文件
如果需要添加功能模块,可在mods-available中建立软连接到mods-enabled.
site-available和site-enabled是网站根目录的配置文件.
同样在site-enabled 中保留的是site-available的软连接
在 site-available有两个文件
| 配置文件名称 | 说明 |
|---|---|
| 000-default.conf | 使用http协议网站的默认网站配置文件 |
| default-ss.conf | https协议网站才使用的默认网站配置文件,使用的话,还需申请SSL证书。 |
000-default.conf
所以主要的配置工作是在000-default.conf中
<VirtualHost *:80>
    # The ServerName directive sets the request scheme, hostname and port that
    # the server uses to identify itself. This is used when creating
    # redirection URLs. In the context of virtual hosts, the ServerName
    # specifies what hostname must appear in the request's Host: header to
    # match this virtual host. For the default virtual host (this file) this
    # value is not decisive as it is used as a last resort host regardless.
    # However, you must set it for any further virtual host explicitly.
    #ServerName www.example.com

    ServerAdmin webmaster@localhost
    DocumentRoot /var/www/html

    # Available loglevels: trace8, ..., trace1, debug, info, notice, warn,
    # error, crit, alert, emerg.
    # It is also possible to configure the loglevel for particular
    # modules, e.g.
    #LogLevel info ssl:warn

    ErrorLog ${APACHE_LOG_DIR}/error.log
    CustomLog ${APACHE_LOG_DIR}/access.log combined

    # For most configuration files from conf-available/, which are
    # enabled or disabled at a global level, it is possible to
    # include a line for only one particular virtual host. For example the
    # following line enables the CGI configuration for this host only
    # after it has been globally disabled with "a2disconf".
    #Include conf-available/serve-cgi-bin.conf
</VirtualHost>

# vim: syntax=apache ts=4 sw=4 sts=4 sr noet
ServerAdmin webmaster@localhost
#设置站点邮箱
DocumentRoot /var/www/html
#DocumentRoot 为该站点的根目录- 在
etc/apache2/mods-available/dir.conf中,DirectoryIndex为Apache默认起始页面
<IfModule mod_dir.c>
        DirectoryIndex index.html index.cgi index.pl index.php index.xhtml index.htm
</IfModule>

# vim: syntax=apache ts=4 sw=4 sts=4 sr noet- 配置中添加php配置
ln -s /etc/apache2/conf-available/php7.4-fpm.conf /etc/apache2/conf-enabled/php7.4-fpm.conf软连接即可
访问index.php
安全加固
参考:
Apache2 security_tips
Apache服务安全加固
推荐:http-announce以获取Apache信息
网上对这部分基本相识
账号设置
根据需要,为 Apache 服务创建用户及用户组。如果没有设置用户和组(默认是www-data),则新建用户,并在 Apache 配置文件中进行指定。
groupadd apache #创建 Apache 用户组
useradd apache -g apache #创建 Apache 用户并加入 Apache 用户组根据在apache2.conf中的信息
# These need to be set in /etc/apache2/envvars
User ${APACHE_RUN_USER}
Group ${APACHE_RUN_GROUP}之后再修改/etc/apache2/envvars文件(注此为Ubuntu系统)
export APACHE_RUN_USER=apache
export APACHE_RUN_GROUP=apache授权设置
- 严格控制 Apache 主目录的访问权限,非超级用户不能修改该目录中的内容。
# ServerRoot: The top of the directory tree under which the server's
# configuration, error, and log files are kept.
#
# NOTE!  If you intend to place this on an NFS (or otherwise network)
# mounted filesystem then please read the Mutex documentation (available
# at <URL:http://httpd.apache.org/docs/2.4/mod/core.html#mutex>);
# you will save yourself a lot of trouble.
#
# Do NOT add a slash at the end of the directory path.
#
#ServerRoot "/etc/apache2"
一般而言,默认配置已经符合要求。
这里有个疑惑为什么给的配置文件中给ServerRoot注释掉?
- 严格设置配置文件和日志文件的权限,防止未授权访问。
/etc/apache/ 默认属主可读写,其他用户拥有只读权限。
total 96
drwxr-xr-x   8 root root  4096 Mar 14 10:15 .
drwxr-xr-x 132 root root 12288 Mar 14 09:14 ..
-rw-r--r--   1 root root  7224 Dec  3 07:55 apache2.conf
drwxr-xr-x   2 root root  4096 Mar 14 21:05 conf-available
drwxr-xr-x   2 root root  4096 Mar 14 21:07 conf-enabled
-rw-r--r--   1 root root  1782 Jul 16  2019 envvars
-rw-r--r--   1 root root 31063 Jul 16  2019 magic
drwxr-xr-x   2 root root 12288 Mar 14 21:05 mods-available
drwxr-xr-x   2 root root  4096 Mar 14 21:05 mods-enabled
-rw-r--r--   1 root root   320 Jul 16  2019 ports.conf
drwxr-xr-x   2 root root  4096 Mar 14 01:37 sites-available
drwxr-xr-x   2 root root  4096 Mar 14 01:37 sites-enabled
将apache2.conf改为600权限,即仅ROOT用户读写
drwxr-xr-x   8 root root  4096 Mar 14 10:15 .
drwxr-xr-x 132 root root 12288 Mar 14 09:14 ..
-rw-------   1 root root  7224 Dec  3 07:55 apache2.conf
drwxr-xr-x   2 root root  4096 Mar 14 21:05 conf-available
drwxr-xr-x   2 root root  4096 Mar 14 21:07 conf-enabled
-rw-r--r--   1 root root  1782 Jul 16  2019 envvars
-rw-r--r--   1 root root 31063 Jul 16  2019 magic
drwxr-xr-x   2 root root 12288 Mar 14 21:05 mods-available
drwxr-xr-x   2 root root  4096 Mar 14 21:05 mods-enabled
-rw-r--r--   1 root root   320 Jul 16  2019 ports.conf
drwxr-xr-x   2 root root  4096 Mar 14 01:37 sites-available
drwxr-xr-x   2 root root  4096 Mar 14 01:37 sites-enabled
日志设置
Apache 设备应配置日志功能,对运行错误、用户访问等事件进行记录,记录内容包括时间,用户使用的 IP 地址等内容,它们也会让您了解对服务器引发的攻击,并允许您检查是否存在必要的安全级别。
- error.log
# ErrorLog: The location of the error log file.
# If you do not specify an ErrorLog directive within a <VirtualHost>
# container, error messages relating to that virtual host will be
# logged here.  If you *do* define an error logfile for a <VirtualHost>
# container, that host's errors will be logged there and not here.
#
ErrorLog ${APACHE_LOG_DIR}/error.log${APACHE_LOG_DIR}在envvars文件有描述
# Only /var/log/apache2 is handled by /etc/logrotate.d/apache2.
export APACHE_LOG_DIR=/var/log/apache2$SUFFIX
LogLevel命令用于调整记录在错误日志中的信息的详细程度,建议设置为 notice。日志的级别,默认是 warn 级别,notice 级别比较详细,但在实际中由于日志会占用大量硬盘空间。
# LogLevel: Control the severity of messages logged to the error_log.
# Available values: trace8, ..., trace1, debug, info, notice, warn,
# error, crit, alert, emerg.
# It is also possible to configure the log level for particular modules, e.g.
# "LogLevel info ssl:warn"
#
LogLevel warn
- access_log
http://httpd.apache.org/docs/2.4/logs.html#accesslog
默认是
#
# The following directives define some format nicknames for use with
# a CustomLog directive.
#
# These deviate from the Common Log Format definitions in that they use %O
# (the actual bytes sent including headers) instead of %b (the size of the
# requested file), because the latter makes it impossible to detect partial
# requests.
#
# Note that the use of %{X-Forwarded-For}i instead of %h is not recommended.
# Use mod_remoteip instead.
#
LogFormat "%v:%p %h %l %u %t \"%r\" %>s %O \"%{Referer}i\" \"%{User-Agent}i\"" vhost_combined
LogFormat "%h %l %u %t \"%r\" %>s %O \"%{Referer}i\" \"%{User-Agent}i\"" combined
LogFormat "%h %l %u %t \"%r\" %>s %O" common
LogFormat "%{Referer}i -> %U" referer
LogFormat "%{User-agent}i" agent添加CustomLog /var/log/apache2/access_log vhost_combined
重启Apache
root@ubuntu:/etc/apache2# find /var -name access_log
/var/log/cups/access_log
/var/log/apache2/access_log
禁止访问外部文件 和 禁止目录列出
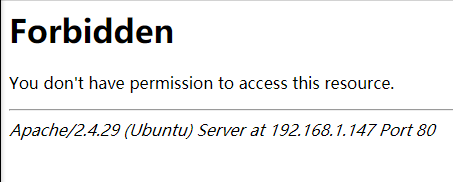
禁止 Apache 访问 Web 目录之外的任何文件。
禁止访问设置在原配置文件中是有说明的,且在官方网站上的安全提示中也提到
- 说明
# Sets the default security model of the Apache2 HTTPD server. It does
# not allow access to the root filesystem outside of /usr/share and /var/www.
# The former is used by web applications packaged in Debian,
# the latter may be used for local directories served by the web server. If
# your system is serving content from a sub-directory in /srv you must allow
# access here, or in any related virtual host.- 与上面说明相对于的默认配置
<Directory />
    Options FollowSymLinks
    AllowOverride None
    Require all denied
</Directory>

<Directory /usr/share>
    AllowOverride None
    Require all granted
</Directory>

<Directory /var/www/>
    Options Indexes FollowSymLinks
    AllowOverride None
    Require all granted
</Directory>

#<Directory /srv/>
#   Options Indexes FollowSymLinks
#   AllowOverride None
#   Require all granted
#</Directory>
简单说明
不允许访问
/usr/share和/var/www之外的根文件系统。
/usr/share用于Debian中打包的Web应用程序
/var/www用于Web服务器服务的本地目录
- 禁止目录列出
在/var/www设置中有Options Indexes FollowSymLinks
Indexes 的作用就是当该目录下没有 index.html 文件时,就显示目录结构,去掉 Indexes,Apache 就不会显示该目录的列表了。
即
<Directory /var/www/>
    Options FollowSymLinks
    AllowOverride None
    Require all granted
</Directory>-
效果

错误页面重新定向
Apache 错误页面重定向功能可以防止敏感信息泄露。
参考:
https://www.howtoing.com/how-to-configure-apache-to-use-custom-error-pages-on-ubuntu-14-04
- 在重新定向前,需要创建一些自定义的页面
custom_404.html
<h1 style='color:red'>Error 404: Not found :-(</h1>
<p>I have no idea where that file is, sorry.  Are you sure you typed in the correct URL?</p>
custom_50x.html
<h1>Oops! Something went wrong...</h1>
<p>We seem to be having some technical difficulties. Hang tight.</p>- 配置
配置文件是000-default.conf
<VirtualHost *:80>
        ServerAdmin webmaster@localhost
        DocumentRoot /var/www/html

        ErrorLog ${APACHE_LOG_DIR}/error.log
        CustomLog ${APACHE_LOG_DIR}/access.log combined

        #ErrorDocument
        ErrorDocument 404 /custom_404.html
        ErrorDocument 500 /custom_50x.html
        ErrorDocument 502 /custom_50x.html
        ErrorDocument 503 /custom_50x.html
        ErrorDocument 504 /custom_50x.html

         <Files "custom_404.html">
             <If "-z %{ENV:REDIRECT_STATUS}">
                 RedirectMatch 404 ^/custom_404.html$
             </If>
        </Files>

</VirtualHost>- 404 当访问不存在的页面时,报错

拒绝服务(dos)攻击
所有网络服务器都可能遭受拒绝服务攻击,这种攻击试图通过占用服务器的资源来阻止对客户机的响应。完全阻止这种攻击是不可能的,但是您可以做一些事情来减轻它们所造成的问题。通常最有效的反dos工具是防火墙或其他操作系统配置。例如,可以将大多数防火墙配置为限制来自任何单个IP地址或网络的并发连接数量,从而防止一系列简单的攻击。当然,这对抵抗分布式拒绝服务攻击(DDoS)毫无帮助。
还有一些特定的Apache HTTP服务器配置设置可以帮助缓解问题
同样该点在官网http://httpd.apache.org/docs/2.4/misc/security_tips.html#page-header 提及,并给出一些设置方案
配置文件为apache.conf
-
# # KeepAlive: Whether or not to allow persistent connections (more than # one request per connection). Set to "Off" to deactivate. # KeepAlive On # # MaxKeepAliveRequests: The maximum number of requests to allow # during a persistent connection. Set to 0 to allow an unlimited amount. # We recommend you leave this number high, for maximum performance. # MaxKeepAliveRequests 100 # # KeepAliveTimeout: Number of seconds to wait for the next request from the # same client on the same connection. # KeepAliveTimeout 5 -
Timeout 300#客户端与服务器端建立连接前的时间间隔 -
可通过http://modules.apache.org/提供许多第三方模块,这些模块可以限制某些客户端行为,从而缓解 DoS 问题。
隐藏 Apache 的版本号
Apache主机在默认状态下,如果遭遇错误页面,除了提示出错之外,还会将你的机器软件环境显示出来,如你的Apache版本,PHP版本。
详细介绍:
ubuntu隐藏 Apache 的版本号
配置文件/etc/apache2/conf-available/security
修改后内容
#
# ServerTokens
# This directive configures what you return as the Server HTTP response
# Header. The default is 'Full' which sends information about the OS-Type
# and compiled in modules.
# Set to one of:  Full | OS | Minimal | Minor | Major | Prod
# where Full conveys the most information, and Prod the least.
#ServerTokens Minimal
ServerTokens Prod
#ServerTokens Full

#
# Optionally add a line containing the server version and virtual host
# name to server-generated pages (internal error documents, FTP directory
# listings, mod_status and mod_info output etc., but not CGI generated
# documents or custom error documents).
# Set to "EMail" to also include a mailto: link to the ServerAdmin.
# Set to one of:  On | Off | EMail
#ServerSignature Off
ServerSignature Off
详细介绍可以看上面的注释
关闭 TRACE功能
关闭 TRACE 功能,防止 TRACE 方法被访问者恶意利用。
与上面一样,配置文件为/etc/apache2/conf-available/security
#
# Set to one of:  On | Off | extended
TraceEnable Off
#TraceEnable On
CGI
建议看官方建议。
动态内容安全性
在 Apache中,mod_security的模块可以被视为 HTTP 防火墙,并且只要配置得足够好,可以
增强动态内容安全性。
后记
收获很多
感觉实际配置中,使用docker的可能性更大,也相对方便、安全。